Navigating through files and directories
Overview
Teaching: 20 min
Exercises: 10 minQuestions
What is the directory tree?
What is a path?
What happens if I get lost?
How do I move around?
How can I see my files and folders?
How can I use flags?
Objectives
To gain understanding of the directory tree, and navigate through it as effectively as a GUI interface.
Explain the similarities and differences between files and directories.
Gain understanding of relative and actual paths.
Use options and arguments to change the behaviour of a shell command.
Demonstrate the usage of tab completion, and explain its advantages.
![]()
The directory tree
If you are used to using click and select GUI operations for finding your way through files and folders on your computer, then using the command line to navigate around for the first time is similar to being dropped into a thick maze in the dark without a torch.
In Linux, everything is a file or a process, even directories. In Linux, folders are referred to as directories. A directory is a file itself, one which contains references to other files.
Each file has its own unique ID formed from the file name and a list of directories. This is why it is possible to have different files with the same name in different directories, you have a unique identifier in the file system.
In the same way on Windows and Mac that you select folders and click to go deeper into the file system, Linux has this method to by using what is known as the directory tree. You can see this in action on a Windows machine through the top Search bar, and you can move around the directory tree using the forward and backwards arrow symbols. In Linux however, we need to physically tell the computer where we want to go.
This is what paths are used for. A path is essentially a route that traverses through a directory tree, which each
branch and “forks” in the tree separated by the / symbol. This symbol also denotes the root directory, the point
at which all directory trees start from. On Windows machines, in the Cmd prgoram, it is denoted with \. The root
directory is usually restricted for administrative use. If you are on a desktop, you have access to this root
directory. For supercomputers, this is restricted.
Slashes
Notice that there are two meanings for the
/character. When it appears at the front of a file or directory name, it refers to the root directory. When it appears inside a path, it’s just a separator.
Let us look at a simple directory structure. This is an important concept to grasp as you move through a file system.
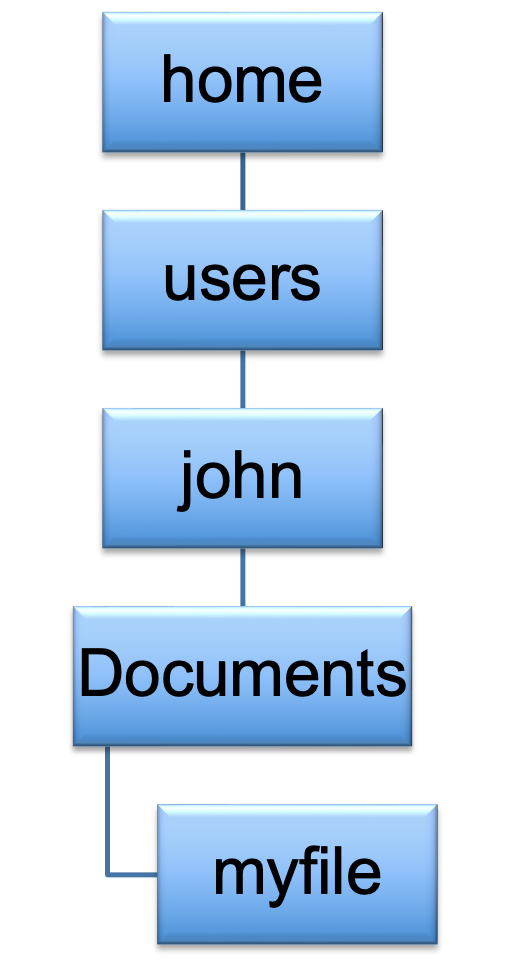
Each of the boxes refers to a directory, and the tree ends at myfile. You can see how the idea of a path arises, so
lets add some slashes in here to turn this directory structure into a path.
/home/users/john/Documents/myfile
This is what is known as an absolute path, which refers as the route from the root directory, to the file that we are
looking at, being myfile.
However, when we log into a machine, we are never put in the root directory. We are put in the home directory of whoever is using the machine. John is logging on, so naturally he wants to be put where his material is. This is where we introduce the term relative path, which is the path to a file or folder relative to where you are at any time. The relative path in this case is;
john/Documents/myfile
We are in the directory john, and we wish to see the path to my file relative from where we are. Relative paths can
be more complex as we stay in one place and try and find a route to other places in our tree. But we will deal with
that later, let’s look into our first few exercises.
Locating yourself in a directory tree
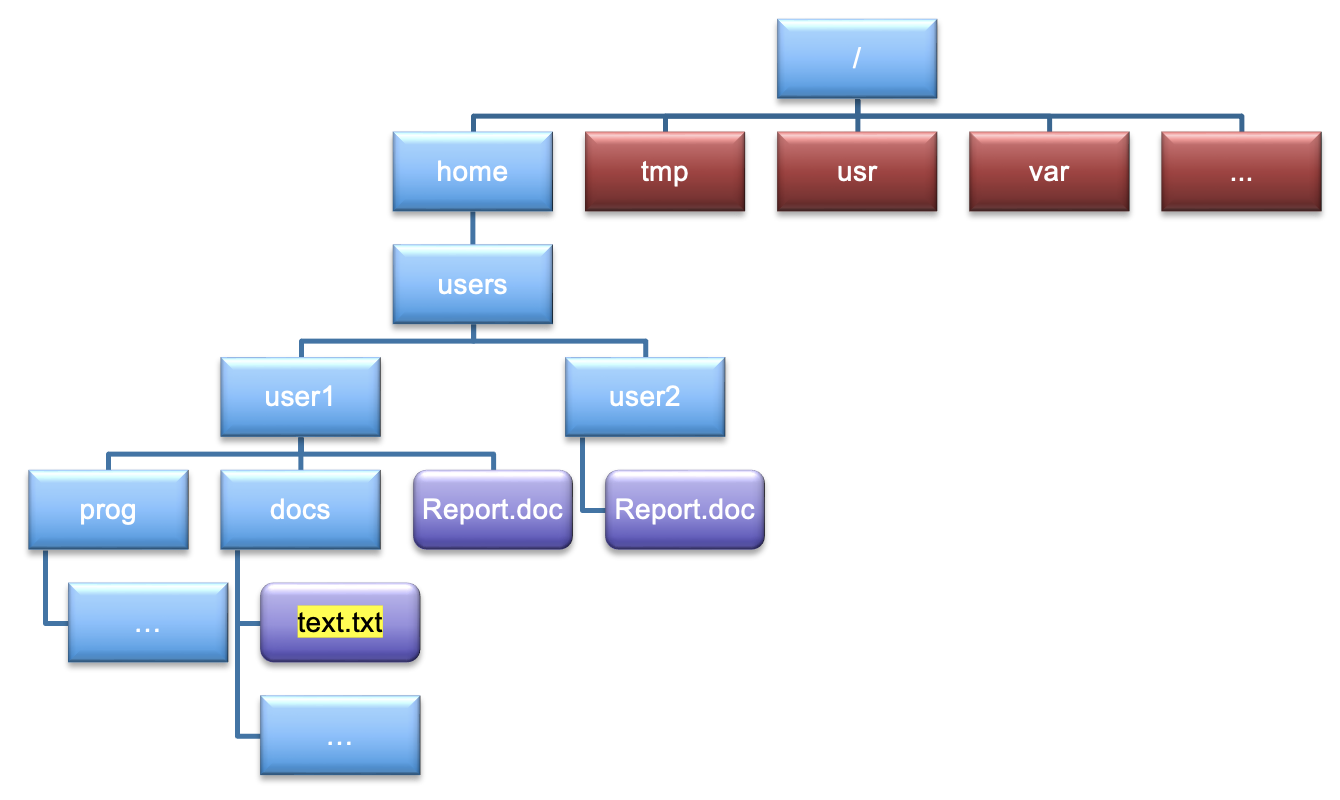
Given what you have learned so far, let’s make things a bit trickier with a more complicated tree structure. Put into the chat the following;
- The absolute path to
text.txt- The relative path to
text.txtif you are in theuser1directory.
Solution
/home/users/user1/docs/text.txt./docs/text.txt
Navigating around
Before we dive into the most commonly used commands for navigation, we should look at a command which creates some empty files we can play around with.
The
touchcommandThis command is not for navigation purposes, but will be useful for generating empty files for us to help with navigation.
By typing
touch ABC, we create an empty file calledABC. Here,touchis the command andABCis the argument we pass to it.Be careful with whitespace, as if you type
touch A B C, it will create 3 files,A,BandC. This is why using underscores (_) or hyphens (-) is often considered best practice.The command
touch A_B_Cwill therefore create a single fileA_B_C.
Create an empty file
Create a single file with a name of your choice. If it has multiple words, separate them with
_or-
The pwd command
One of the most important things to know in Linux at any point is where you actually are. This, thankfully is easy to
do in Linux by running a command called pwd (which stands for ‘print working directory’). Remember that directories
are like places - at any time while we are using the shell we are in exactly one place, called our
current working directory. Directories in Linux are the same as folders. Commands mostly read and write files in
the current working directory, i.e. ‘here’, so knowing where you are before running a command is important. pwd shows
you where you are:
$ pwd
Your output will depend on where you are. As you are starting out, you are likely going to be placed where your shell considers as “home”. You may have something like this.
/Users/johnsmith
As you get more used to UNIX commands, you will find that you need this command less and less, but for the moment, practice using it whenever you are at any point unsure where you are.
Home Directory Variation
The home directory path will look different on different operating systems. On Linux it may look like
/home/johnsmith, and on Windows it will be similar toC:\Documents and Settings\johnsmithorC:\Users\johnsmith(Note that it may look slightly different for different versions of Windows.). In future examples, we’ve used Mac output as the default - Linux and Windows output may differ slightly but should be generally similar.We will also assume that your
pwdcommand returns your users home directory. Ifpwdreturns something different you may need to navigate there usingcdor some commands in this lesson will not work as written. See Thecdcommand for more details on thecdcommand.
The ls command
We saw this command before in the previous episode, but now lets go into more details. This is one of the most commonly used commands you will get to use.
ls prints the names of the files and directories in the current directory as we saw previously, but we can make its
output more comprehensible by using the -F option which tells ls to classify the output by adding a marker to
file and directory names to indicate what they are:
- a trailing
/indicates that this is a directory - those with an extension
.docx,.cor sometimes no extension are regular files
Depending on your default options, the shell might also use colours to indicate whether each entry is a file or directory, or an executable.
$ ls -F
Applications/ Documents/    Library/      Music/        Public/
Desktop/      Downloads/    Movies/       Pictures/
Let us now use the -a flag as before, which shows all the files in a directory. Now, execute the command below;
$ ls -aF
You may have noticed a big change, with items that may look something like this;
./            ../           .anaconda/    .bash_history/ .ssh/
Applications/ Documents/    Library/      Music/         Public/
Desktop/      Downloads/    Movies/       Pictures/
You can see that some new options have appeared with a . beforehand. These are hidden files or directories which do
not appear in normal view. The single . refers to the directory you are currently in. .. on the other hand refers
to the directory above the one that you are in. We will look more into details about this as we look into moving around
directories.
Let’s say we want to list all the directories that start with the letter D, we can use a handy key called Tab which
lists out a bunch of options.
$ ls D
Documents/ Desktop/ Downloads/
Tab can also help autocomplete. Typing the following followed by pressing Tab will autocomplete the word Desktop
$ ls De
Desktop/
The cd command
We next move onto the command that you will use most often, cd which stands for ‘change directory’. This command is
akin to double clicking a folder in a graphical interface to get into a folder.
But cd alone isn’t enough, we need to follow it with a directory name to change our working directory.
Let’s say we want to move into our Desktop directory. Using our trick from above with the Tab key will ensure that
the directory exists, and will autocomplete.
$ cd Desktop
$ pwd
/Users/johnsmith/Desktop
Note how the present working directory has changed from when we initially used the pwd command.
We recommend to use this every time you change directory, like leaving breadcrumbs in the famous Hansel and Gretel
story.
Now let’s say we want to go back to where we were. We can do two things. The first is type cd by itself, but this
will always put us back in the home directory, regardless of where we call it. It is a handy feature, but can cause you
to get lost quickly! The more commonly used way is by referencing our “upper directory” which we covered above.
$ cd ..
$ pwd
/Users/johnsmith
Using this we are back in the directory above where we are
Whitespace matters
For all Linux commands, whitespace is of paramount importance when feeding arguments into a command. Commands like
ls-l, andcd..will not work, and you will get an error saying;command not foundThis error signifies a typo which needs correcting
Practice using
cdExperiment with the cd command and see what happens when you try and use cd along with the following arguments. Don’t forget to use
pwdto tell you where you are at any time.
..- Nothing
.new../../~
In the next episode, we will create a number of directories and then practice the cd command with a file structure
that we created ourselves.
What works with
cd?Match up the situations below with their expected output. Assume that you are in a directory which contains a single directory,
Documents.
Command Outcome cdMoves back one directory cd.No such file or directorycd DesktopMoves you back two directories cd ../..Moves you back into the “home” directory cd ..Does nothing, as you are already here cd Documentscommand not foundcd ~Moves you back into the “home” directory cd .Moves you into DesktopSolution
Command Outcome cdMoves you back into the “home” directory cd.command not foundcd DesktopMoves you into Desktopcd ../..Moves you back two directories cd ..Moves back one directory cd DocumentsNo such file or directorycd ~Moves you back into the “home” directory cd .Does nothing, as you are already here
Getting help
There are a couple of ways of getting help in Linux for a command, lets take ls as an example
- We can pass a
--helpoption to the command, such as:$ ls --help - We can read its manual with
man, such as:$ man ls
Depending on your environment you might find that only one of these works (either man or --help, e.g., man works
for macOS and --help typically works for Git Bash).
We’ll describe both ways below.
The --help option
Many bash commands, and programs that people have written that can be
run from within bash, support a --help option to display more
information on how to use the command or program.
$ ls --help
The man command
The other way to learn about ls is to type
$ man ls
The command man is short for manual. This will turn your terminal into a page with a description
of the ls command and its options.
To navigate through the man pages, you may use ↑ and ↓ to move line-by-line,
or try B and Spacebar to skip up and down by a full page. To search for a character or word in the man pages,
use / followed by the character or word you are searching for. Sometimes a search will result in multiple hits. If
so, you can move between hits using N (for moving forward) and Shift + N (for moving backward).
To quit the man pages, press Q.
Manual pages on the web
Of course there is a third way to access help for commands: searching the internet via your web browser. When using internet search, including the phrase
unix man pagein your search query will help to find relevant results.GNU provides links to its manuals including the core GNU utilities, which covers many commands introduced within this lesson.
The history command
Although not a command for getting help, it is very helpful when typing lots of commands, as one can easily forget what commands you have typed.
$ history
1 pwd
2 ls
3 ls -F
...
The shell stores up to the last 1000 commands, and you can use pipes to search through to find specific commands. We will cover pipes in episode 4.
Key Points
Information is stored in files, which are stored in directories. A directory is itself a file which contains references to other files.
The
pwdcommand will always show where you are at any time.The
lscommand lists the contents of the present working directory. Additional options and arguments can filter this list further.The
mancommand will return usage and flags of any command you specify
..means ‘the directory above the current one’ in the directory tree, whereas.on its own specifies ‘the current directory’.The
cdcommand allows you to navigate through directories, but you also need to direct it to where you want to go usingcd [path].Use
historyto display recent commands, and![number]to repeat a command by number.