Introducing Linux and the Command Line
Overview
Teaching: 10 min
Exercises: 5 minQuestions
What is Linux and Unix?
What is the command line and why is it used?
How do I get help when using the command line?
Objectives
Introduce the concept of Linux/UNIX operating systems
Explain how the shell relates to the keyboard, the screen, the operating system, and users’ programs.
Explain when and why command-line interfaces should be used instead of graphical interfaces.
![]()
Background
Humans and computers commonly interact in many different ways, such as through a keyboard and mouse, touch screen interfaces, or using speech recognition systems. The most widely used way to interact with personal computers is called a graphical user interface (GUI).
With a GUI, we give instructions by clicking a mouse and using menu-driven interactions.
While the visual aid of a GUI makes it intuitive to learn, this way of delivering instructions to a computer scales very poorly. Take the following task as an example:
For a literature search, you have to copy the third line of one thousand text files in one thousand different directories and paste it into a single file. Using a GUI, you would not only be clicking at your desk for several hours, but you could potentially also make an error in the process of completing this repetitive task. This is where we take advantage of the Unix shell. The Unix shell is both a command-line interface (CLI) and a scripting language, allowing such repetitive tasks to be done automatically and fast. If these tasks require a long time, having then run in the background while you spent your time on more useful things can be a big advantage.
With the proper commands, the shell can repeat tasks with or without some modification as many times as we want. Using the shell, the task in the literature example can be accomplished in seconds.
Linux and UNIX
Most of us have either Windows or Mac operating systems (OS), and these are both GUI based, with Windows being by far the most popular worldwide. Windows becomes more prone to malware as a result of this, whereas Mac, with its lower user base, is less likely to be affected. Linux is even less affected by malware.
As a result, supercomputers will always have an OS with this type of setup. There are plenty of advantages of doing so;
- 100% of TOP500 use it
- Operating system is more reliable and secure
- Open source software
- Massive toolsets for programming
- Very flexible and powerful
The most popular varietiy of Unix is GNU/Linux, which itself is a clone of Unix, with its source code available to the general public.
Both Windows and Mac have their own command line interfaces like Linux, namely Command Prompt (Windows) and Terminal (Mac), with Terminal being much more effective. The OS is GUI based, with these extra applciations added on for developers. Linux however, is primarily command line based, with versions having GUI support (Ubuntu, Redhat, etc)
Starting a terminal
Mac and Linux users have life easy, the Terminal application has all the UNIX commands you will ever need. Windows users do not have things as easy, as the Command Prompt app does not support any UNIX commands.
There are two commonly used Linux terminal emulators, MobaXterm and Git Bash.
If you have already installed MobaXterm (Portable Edition) and are used to the setup, feel free to continue using it.
If you do not yet have a terminal emulator, or find MobaXterm confusing, then we recommend you to install Git Bash.
Take a minute to set install or start your terminal emulator. It can continue in the background as we continue
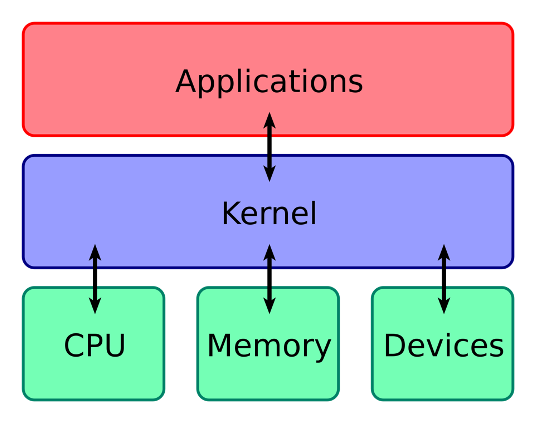
The Shell vs the Kernel
The shell is a program where users can type commands, and is accessed through a terminal. With the shell, it’s possible to invoke complicated programs like climate modeling software or simple commands that create an empty directory with only one line of code.
The most popular Unix shell is Bash (the Bourne Again SHell — so-called because it’s derived from a shell written by Stephen Bourne). Bash is the default shell on most modern implementations of Unix and in most packages that provide Unix-like tools for Windows (MobaXterm, Git Bash, PuTTy).
Using the shell will take some effort and some time to learn. While a GUI presents you with choices to select, CLI choices are not automatically presented to you, so you must learn a few commands like new vocabulary in a language you’re studying.
However, unlike a spoken language, a small number of “words” (i.e. commands) gets you a long way, and we’ll cover those essential few today.
The kernel is a computer program that is at the hear of the computer operating system. We as the prgorammers don’t interact with it directly.
When you execute a command in the shell, it searches for the program, and then requests the kernel to execute the program. At the end of the process, the shell returns to the prompt, and awaits further commands.
The command line
The grammar of a shell allows you to combine existing tools into powerful pipelines and handle large volumes of data automatically. Sequences of commands can be written into a script, improving the reproducibility of workflows.
In addition, the command line is often the easiest way to interact with remote machines and supercomputers. Familiarity with the shell is near essential to run a variety of specialized tools and resources including high-performance computing systems. As clusters and cloud computing systems become more popular for scientific data crunching, being able to interact with the shell is becoming a necessary skill. We can build on the command-line skills covered here to tackle a wide range of scientific questions and computational challenges.
When the shell is first opened, you are presented with a prompt, indicating that the shell is waiting for input.
This can depend on the type of shell, but is typically $ or %.
Most importantly, when typing commands, either from these lessons or from other sources,
do not type the prompt, only the commands that follow it.
Also note that after you type a command, you have to press the Enter key to execute it.
If the command has executed, depending on the command, no output will appear on the screen and you will be returned to the prompt. This is an indication that your command has executed as specified.
The prompt is followed by a text cursor, a character that indicates the position where your typing will appear.
The cursor is usually a flashing or solid block, but it can also be an underscore (_) or a pipe (|). You may have
seen it in a text editor program, for example.
The shell then requires information on what it needs to work on, in the same way a mouse won’t click unless you tell it or a keyboard won’t type out words. The command line needs input to work. These inputs are called commands. A very simple command can be as shown below.
courseXX@login2:~$ ls
All the information to the left of the $ is the prompt, and we are entering the command ls, which is short for
list. It lists out the contents of the directory that you are in. For Windows and Mac, this is shown automatically, as
you move from folder to folder. In Linux you need to specify it.
Most commands have additional options to make them more specific, and these are known as flags. Flags are accessed
by using - for a single letter flag or -- for longer options. Below is an example of a command with both short and
long option flags.
courseXX@login2:~$ ls -l --all
Here, the -l gives a full list of the properties of a directory that you are in, and the --all shows hidden files.
Hidden files themselves are important, and we will come back to them later.
You may also notice that there are spaces between each flag and command, this is because whitespace is essential in Linux. Without whitespace, the shell does not know what you are doing and will throw an error.
Some commands however cannot work by themselves and flags alone. What if you wanted to copy a file from one place to
another? Additional arguments are needed. With our ls command, we can also introduce an argument as well as all the
flags
courseXX@login2:~$ ls -l --all test/
Here the argument we are passing is test/, which is a directory
Many commands come with additional flags
An important thing to remember is that you will make mistakes, and that computers are not human, so if a command is not exactly correct it will raise an error.
Command not found
If the shell can’t find a program whose name is the command you typed, it will print an error message such as:
$ ksks: command not foundThis might happen if the command was mis-typed or if the program corresponding to that command is not installed.
Order matters!
Typing a command, arguments or flags out of order can result in mistakes and errors being raised by the shell. Have a look at the code below, and try and deduce which one(s) are in the correct order, and which ones will not work.
la -sls --als -ls -z-l lsls -all --l prog/ls --all -l prog/ls -l allprog/ lsls -l --all prog/ls -l--all prog/Solution
- No,
ladoesn’t exist despite-sbeing a valid flag.- No,
--ais a short flag option.- No, there is no option specified.
- No,
-zis an invalid flag.- No, the command must come before the flag.
- No,
-allshould be--alland--lshould be-l.- Yes, the order of the flags doesn’t matter.
- Technically yes, but only if there is an item called all. We are missing the
--if we want to use it as a flag.- No, the command comes before the argument.
- Yes, this vertically lists all the files (+ hidden ones) in
prog/.- No, there is no whitespace between
-land--all
You may have made a few mistakes there, if not, then well done, if so, that’s also ok! Programmers make Linux typos and errors on a minutely basis, never mind hourly! Its often worth pointing out that some flags and options may work on Linux itself but not Mac or Windows terminal emulators. The shell program can vary, but for the most part stays fairly consistent.
It is often the case that you make a typo at the beginning of a long command, and you may feel like you need to retype the whole thing. No need, as there are a few keyboard shortcuts that you may find helpful.
| Action | Keyboard | Action | Keyboard |
|---|---|---|---|
| Move left | left arrow |
Delete previous character | Backspace |
| Move right | right arrow |
Delete previous word | Ctrl w |
| Move to beginning of line | Ctrl a |
Delete next character | Ctrl d/Delete |
| Move to end of line | Ctrl e |
Delete rest of the line | Ctrl k |
| Previous command entered | up arrow |
Next command entered | down arrow |
In the next few episodes we will learn about the different commands, and get practice on using them.
Key Points
UNIX is the original operating system, Linux refers to the kernel itself and is used by most top supercomputers.
On Linux systems, like supercomputers, everything is done on the command line.
Many commands need options (flags) beginning with a
-to be utilised effecitvelyMany commands need additional arguments to be passed into them to perform
The root directory is specified by the root directory, referred to as
/.Directory names in a path are separated with
/on Unix and Mac, but by\on Windows.Whitespace matters. Every space makes a difference, so be careful what you are typing.
Navigating through files and directories
Overview
Teaching: 20 min
Exercises: 10 minQuestions
What is the directory tree?
What is a path?
What happens if I get lost?
How do I move around?
How can I see my files and folders?
How can I use flags?
Objectives
To gain understanding of the directory tree, and navigate through it as effectively as a GUI interface.
Explain the similarities and differences between files and directories.
Gain understanding of relative and actual paths.
Use options and arguments to change the behaviour of a shell command.
Demonstrate the usage of tab completion, and explain its advantages.
![]()
The directory tree
If you are used to using click and select GUI operations for finding your way through files and folders on your computer, then using the command line to navigate around for the first time is similar to being dropped into a thick maze in the dark without a torch.
In Linux, everything is a file or a process, even directories. In Linux, folders are referred to as directories. A directory is a file itself, one which contains references to other files.
Each file has its own unique ID formed from the file name and a list of directories. This is why it is possible to have different files with the same name in different directories, you have a unique identifier in the file system.
In the same way on Windows and Mac that you select folders and click to go deeper into the file system, Linux has this method to by using what is known as the directory tree. You can see this in action on a Windows machine through the top Search bar, and you can move around the directory tree using the forward and backwards arrow symbols. In Linux however, we need to physically tell the computer where we want to go.
This is what paths are used for. A path is essentially a route that traverses through a directory tree, which each
branch and “forks” in the tree separated by the / symbol. This symbol also denotes the root directory, the point
at which all directory trees start from. On Windows machines, in the Cmd prgoram, it is denoted with \. The root
directory is usually restricted for administrative use. If you are on a desktop, you have access to this root
directory. For supercomputers, this is restricted.
Slashes
Notice that there are two meanings for the
/character. When it appears at the front of a file or directory name, it refers to the root directory. When it appears inside a path, it’s just a separator.
Let us look at a simple directory structure. This is an important concept to grasp as you move through a file system.
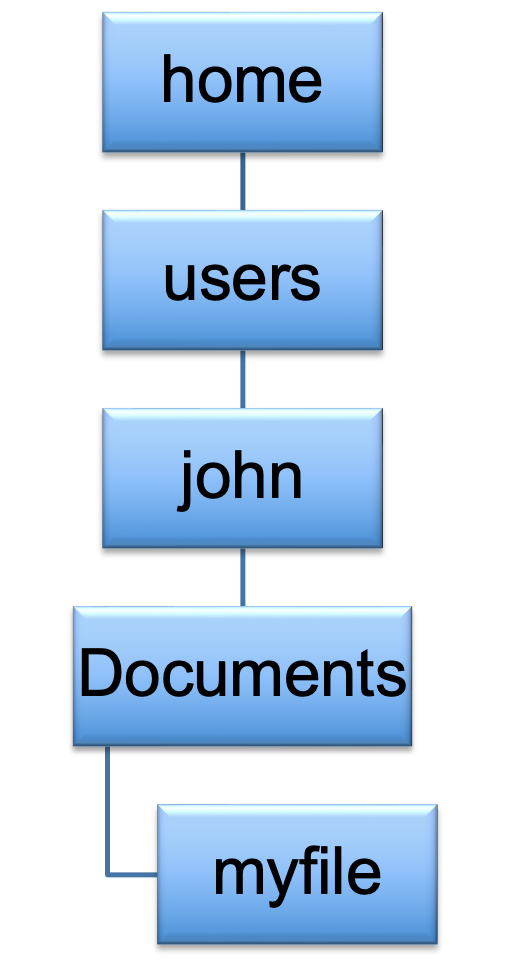
Each of the boxes refers to a directory, and the tree ends at myfile. You can see how the idea of a path arises, so
lets add some slashes in here to turn this directory structure into a path.
/home/users/john/Documents/myfile
This is what is known as an absolute path, which refers as the route from the root directory, to the file that we are
looking at, being myfile.
However, when we log into a machine, we are never put in the root directory. We are put in the home directory of whoever is using the machine. John is logging on, so naturally he wants to be put where his material is. This is where we introduce the term relative path, which is the path to a file or folder relative to where you are at any time. The relative path in this case is;
john/Documents/myfile
We are in the directory john, and we wish to see the path to my file relative from where we are. Relative paths can
be more complex as we stay in one place and try and find a route to other places in our tree. But we will deal with
that later, let’s look into our first few exercises.
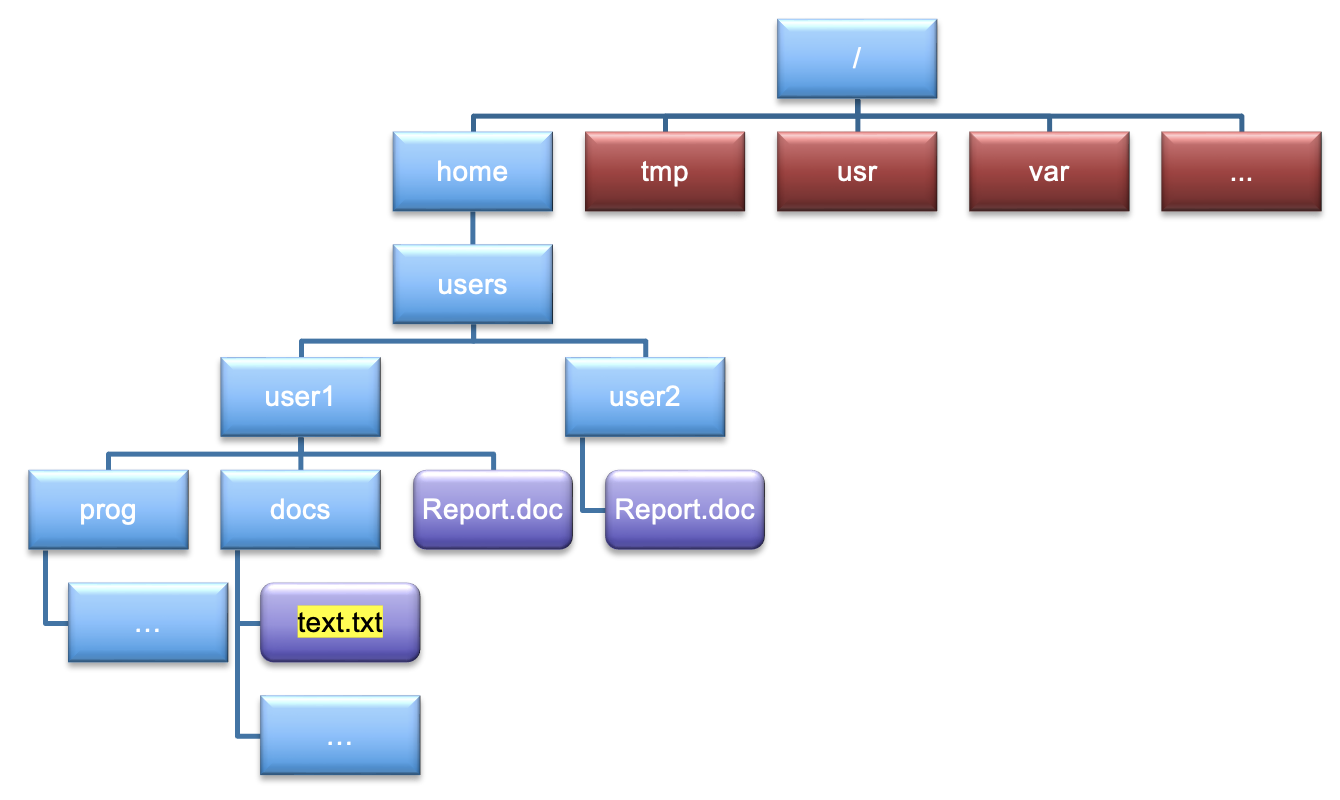
Locating yourself in a directory tree
Given what you have learned so far, let’s make things a bit trickier with a more complicated tree structure. Put into the chat the following;
- The absolute path to
text.txt- The relative path to
text.txtif you are in theuser1directory.
Solution
/home/users/user1/docs/text.txt./docs/text.txt
Navigating around
Before we dive into the most commonly used commands for navigation, we should look at a command which creates some empty files we can play around with.
The
touchcommandThis command is not for navigation purposes, but will be useful for generating empty files for us to help with navigation.
By typing
touch ABC, we create an empty file calledABC. Here,touchis the command andABCis the argument we pass to it.Be careful with whitespace, as if you type
touch A B C, it will create 3 files,A,BandC. This is why using underscores (_) or hyphens (-) is often considered best practice.The command
touch A_B_Cwill therefore create a single fileA_B_C.
Create an empty file
Create a single file with a name of your choice. If it has multiple words, separate them with
_or-
The pwd command
One of the most important things to know in Linux at any point is where you actually are. This, thankfully is easy to
do in Linux by running a command called pwd (which stands for ‘print working directory’). Remember that directories
are like places - at any time while we are using the shell we are in exactly one place, called our
current working directory. Directories in Linux are the same as folders. Commands mostly read and write files in
the current working directory, i.e. ‘here’, so knowing where you are before running a command is important. pwd shows
you where you are:
$ pwd
Your output will depend on where you are. As you are starting out, you are likely going to be placed where your shell considers as “home”. You may have something like this.
/Users/johnsmith
As you get more used to UNIX commands, you will find that you need this command less and less, but for the moment, practice using it whenever you are at any point unsure where you are.
Home Directory Variation
The home directory path will look different on different operating systems. On Linux it may look like
/home/johnsmith, and on Windows it will be similar toC:\Documents and Settings\johnsmithorC:\Users\johnsmith(Note that it may look slightly different for different versions of Windows.). In future examples, we’ve used Mac output as the default - Linux and Windows output may differ slightly but should be generally similar.We will also assume that your
pwdcommand returns your users home directory. Ifpwdreturns something different you may need to navigate there usingcdor some commands in this lesson will not work as written. See Thecdcommand for more details on thecdcommand.
The ls command
We saw this command before in the previous episode, but now lets go into more details. This is one of the most commonly used commands you will get to use.
ls prints the names of the files and directories in the current directory as we saw previously, but we can make its
output more comprehensible by using the -F option which tells ls to classify the output by adding a marker to
file and directory names to indicate what they are:
- a trailing
/indicates that this is a directory - those with an extension
.docx,.cor sometimes no extension are regular files
Depending on your default options, the shell might also use colours to indicate whether each entry is a file or directory, or an executable.
$ ls -F
Applications/ Documents/    Library/      Music/        Public/
Desktop/      Downloads/    Movies/       Pictures/
Let us now use the -a flag as before, which shows all the files in a directory. Now, execute the command below;
$ ls -aF
You may have noticed a big change, with items that may look something like this;
./            ../           .anaconda/    .bash_history/ .ssh/
Applications/ Documents/    Library/      Music/         Public/
Desktop/      Downloads/    Movies/       Pictures/
You can see that some new options have appeared with a . beforehand. These are hidden files or directories which do
not appear in normal view. The single . refers to the directory you are currently in. .. on the other hand refers
to the directory above the one that you are in. We will look more into details about this as we look into moving around
directories.
Let’s say we want to list all the directories that start with the letter D, we can use a handy key called Tab which
lists out a bunch of options.
$ ls D
Documents/ Desktop/ Downloads/
Tab can also help autocomplete. Typing the following followed by pressing Tab will autocomplete the word Desktop
$ ls De
Desktop/
The cd command
We next move onto the command that you will use most often, cd which stands for ‘change directory’. This command is
akin to double clicking a folder in a graphical interface to get into a folder.
But cd alone isn’t enough, we need to follow it with a directory name to change our working directory.
Let’s say we want to move into our Desktop directory. Using our trick from above with the Tab key will ensure that
the directory exists, and will autocomplete.
$ cd Desktop
$ pwd
/Users/johnsmith/Desktop
Note how the present working directory has changed from when we initially used the pwd command.
We recommend to use this every time you change directory, like leaving breadcrumbs in the famous Hansel and Gretel
story.
Now let’s say we want to go back to where we were. We can do two things. The first is type cd by itself, but this
will always put us back in the home directory, regardless of where we call it. It is a handy feature, but can cause you
to get lost quickly! The more commonly used way is by referencing our “upper directory” which we covered above.
$ cd ..
$ pwd
/Users/johnsmith
Using this we are back in the directory above where we are
Whitespace matters
For all Linux commands, whitespace is of paramount importance when feeding arguments into a command. Commands like
ls-l, andcd..will not work, and you will get an error saying;command not foundThis error signifies a typo which needs correcting
Practice using
cdExperiment with the cd command and see what happens when you try and use cd along with the following arguments. Don’t forget to use
pwdto tell you where you are at any time.
..- Nothing
.new../../~
In the next episode, we will create a number of directories and then practice the cd command with a file structure
that we created ourselves.
What works with
cd?Match up the situations below with their expected output. Assume that you are in a directory which contains a single directory,
Documents.
Command Outcome cdMoves back one directory cd.No such file or directorycd DesktopMoves you back two directories cd ../..Moves you back into the “home” directory cd ..Does nothing, as you are already here cd Documentscommand not foundcd ~Moves you back into the “home” directory cd .Moves you into DesktopSolution
Command Outcome cdMoves you back into the “home” directory cd.command not foundcd DesktopMoves you into Desktopcd ../..Moves you back two directories cd ..Moves back one directory cd DocumentsNo such file or directorycd ~Moves you back into the “home” directory cd .Does nothing, as you are already here
Getting help
There are a couple of ways of getting help in Linux for a command, lets take ls as an example
- We can pass a
--helpoption to the command, such as:$ ls --help - We can read its manual with
man, such as:$ man ls
Depending on your environment you might find that only one of these works (either man or --help, e.g., man works
for macOS and --help typically works for Git Bash).
We’ll describe both ways below.
The --help option
Many bash commands, and programs that people have written that can be
run from within bash, support a --help option to display more
information on how to use the command or program.
$ ls --help
The man command
The other way to learn about ls is to type
$ man ls
The command man is short for manual. This will turn your terminal into a page with a description
of the ls command and its options.
To navigate through the man pages, you may use ↑ and ↓ to move line-by-line,
or try B and Spacebar to skip up and down by a full page. To search for a character or word in the man pages,
use / followed by the character or word you are searching for. Sometimes a search will result in multiple hits. If
so, you can move between hits using N (for moving forward) and Shift + N (for moving backward).
To quit the man pages, press Q.
Manual pages on the web
Of course there is a third way to access help for commands: searching the internet via your web browser. When using internet search, including the phrase
unix man pagein your search query will help to find relevant results.GNU provides links to its manuals including the core GNU utilities, which covers many commands introduced within this lesson.
The history command
Although not a command for getting help, it is very helpful when typing lots of commands, as one can easily forget what commands you have typed.
$ history
1 pwd
2 ls
3 ls -F
...
The shell stores up to the last 1000 commands, and you can use pipes to search through to find specific commands. We will cover pipes in episode 4.
Key Points
Information is stored in files, which are stored in directories. A directory is itself a file which contains references to other files.
The
pwdcommand will always show where you are at any time.The
lscommand lists the contents of the present working directory. Additional options and arguments can filter this list further.The
mancommand will return usage and flags of any command you specify
..means ‘the directory above the current one’ in the directory tree, whereas.on its own specifies ‘the current directory’.The
cdcommand allows you to navigate through directories, but you also need to direct it to where you want to go usingcd [path].Use
historyto display recent commands, and![number]to repeat a command by number.
Working with files and directories
Overview
Teaching: 15 min
Exercises: 15 minQuestions
How do I create, copy, delete files and directories?
Objectives
How to create a directory hierarchy that matches a given diagram and how to navigate through it.
Delete, copy and move specified files and/or directories
![]()
Creating and removing directories
Before we start with creating new directories and doing other operations, we should find a place to work, otherwise material gets lost.
Cloning a repository
Online repositories contain written code in a directory. Github is a common place for people to upload their code in a safe place online, and so others can use it, comment and make changes. Many coding libraries are stored on GitHub, and it is where we store the materials for this lesson.
We are going to get you to clone this repo to your computer. Using the
cdcommand, navigate to a directory which is easy for you to find (Desktop, or aCoursesdirectory inDocuments), and then type the following command in your terminal.git clone https://github.com/ICHEC-learn/intro-to-linux.gitThis will clone the repository, which includes slides for the lesson into the directory that you are in. It may take a minute.
Then type
cd intro-to-linux/testand you will arrive into that directory. Typepwdso you know where you are andlsto confirm that there are files calledREADME.md,hamlet.txtand a directory,wildcards/. We will get to these in later episodes.
Creating directories can be done very easily, with the mkdir command, followed by the name of the directory that you
wish to make. So, let us create a new directory and then us our ls command to show that is has been created
$ mkdir mydir
$ ls -F
README.md mydir/
Now we will move into it, then confirm the directory that you are in.
$ cd mydir
$ pwd
/Users/path/to/intro-to-linux/test/mydir/
Seems ok, doesn’t it? Now let us move back up one directory and then remove our newly created directory with our new
command rmdir followed by the directory name.
$ cd ..
$ rmdir mydir
$ ls
On typing ls you will notice that the directory mydir has been removed. So let’s try this again with a challenge.
Creating and removing a directory
For this we are going to remove a directory that has a file in it, so.
- Create a new directory
- Change into the directory
- Create a new file
- Move back one directory
- Remove it
Solution
mkdir newdircd mydirtouch myfilecd ..rmdir mydirYou may have noticed that we get an error message;
rmdir: newdir: Directory not emptyWe will now introduce the next command, which should be treated with care!
Getting lost with
cdAt the beginning, you may find that you get lost easily using
cd, or more specifically,cdon its own. There is a small shortcut that you can use,cd -, which puts you back to the previous directory you were in.
Removing files
That last challenge was designed to catch you out, as the rmdir command only works with directories that are empty.
We now introduce a command that should be handled with care. The rm command.
Why “handled with care” you may ask! Because the shell has no recycle bin that we can recover deleted files from (though most graphical interfaces to Unix do). Instead, when we delete files, they are unlinked from the file system so that their storage space on disk can be recycled. Tools for finding and recovering deleted files do exist, but there’s no guarantee they’ll work in any particular situation, since the computer may recycle the file’s disk space right away.
So when you delete files and directories in the shell… it’s gone!
Let us try removing the mydir directory we created in the exercise.
$ rm mydir/
rm: mydir: is a directory
So as you can see, we cannot use rm by itself to remove a directory, but let us move inside mydir and delete the
file from there
$ cd mydir/
$ rm myfile
$ ls
The output here should be nothing, as we have deleted the file myfile. And remember, there is no way of getting it
back! Let’s have a look at a way of using rm safely.
Using
rmsafelyBy now you have seen the power of using
rm, but we can add a useful flag,-iwhich will request the user to confirm we want the file removed. So, create a new file usingtouch newfile, and then try and remove it using the extra flag.Notice a difference? What are the different options should you try?
Solution
$ touch newfile
$ rm -i newfile
The
-ioption will prompt before (every) removal (useYto confirm deletion orNto keep the file).
You can use rm with multiple flags, but watch out as here be dragons! The -r flag can be particularly useful when
trying to remove directories with a lot of files in it. Instead of removing each file one at a time, you can remove all
files in a directory and the directory itself by using;
$ rm -r mydir/
As with other commands, unless the directory/files can be seen by the program in the current working directory, the command will not run.
Below you can find a few of the different flags that rm supports.
| Flag | Action | Danger Level |
|---|---|---|
-i |
Requests confirmation before removing a file | None |
-r |
Removes the file hierarchy, removing the directory and all files within it | Medium |
-f |
Removes files without confirmation, regardless of file permissions | High |
Death command
You may have been able to deduce that there is a command that will remove everything with no prompting. Combined with wildcards, (which will be discussed in the next episode) this can remove everything.
$ rm -rf *So, a word of advice… don’t ever type this!
Moving and Copying
Now we move onto safer commands. The mv command can do two things.
- Move a file from one location to another
- Change the name of the file.
Let’s have a look at this in action. Make sure you are in the test directory. You should have a README.md file,
hamlet.txt and possibly a directory in there. Create a new directory if there is not one there.
First, let’s change the extension of the README file from .md to .txt. We need the original file name, as well as
the name/location that we want to rename it to.
$ mv README.md README.txt
$ ls README
README.txt
One must be careful when specifying the target file name, since mv will silently overwrite any existing file with the
same name, which could lead to data loss. An additional option, mv -i (or mv --interactive), can be used to make
mv ask you for confirmation before overwriting.
Now, lets move hamlet.txt into a directory, let’s call it newdir
$ mv hamlet.txt newdir/
$ ls
You will see that hamlet.txt is no longer there, as it has been moved to newdir. So when we head in there, we can
see that our file has indeed been moved there.
$ cd newdir/
$ ls
hamlet.txt
Now let us introduce the copy command, cp, which works in the same way as mv, specify the file you want to copy,
and where you want to copy it to. This second argument, like mv can be a new file, or a different directory.
So lets copy hamlet.txt to the directory above our current one.
$ cp hamlet.txt ../
Heading up to that extra directory and we see that the file has indeed been copied.
Let’s finish this off with a bigger challenge, creating a directory hierarchy.
Creating a directory hierarchy
Look at the directory structure below, and recreate it. You should undertake the following steps.
- Ensure you are in the
test/newdirdirectory- List all the files in the directory, then list all the hidden files
- Create a new directory called
01and move into it- Create a new file called
README.txt- Move back one directory
- Create two more directories
02and03. In02, create a new directory calledsubdir- In
03, create a file calledscript.sh- Copy
script.shto the02/subdirfolder, then move into it to confirm it is there- Remove this copied file, try using the
-iflag
Use
pwdandlswhere needed so you can confirm where you are at any timeSolution
cd /path-to/test/newdirls,ls -amkdir 01,cd 01touch README.txtcd ..mkdir 02 03,cd 02,mkdir subdircd ../03,touch script.shcp script.sh ../02/subdir/,cd ../02/subdirrm -i script.sh

Key Points
Most files’ names are
something.extension. The extension isn’t required, and doesn’t guarantee anything, but is normally used to indicate the type of data in the file.
cp [old] [new]copies a file.
mv [old] [path]moves a file into the specified path,mv [old] [new]renames a file.
mkdir [path]creates a new directory.
rmdir [path]removes an empty directory.rm [path]removes a file. These are irreversible as the shell does not have a recycle bin.
Useful Tools
Overview
Teaching: 25 min
Exercises: 15 minQuestions
How can I view file contents without needing a text editor
How do wildcards work?
How can I search for a string in a file
What are pipes and how do they work?
What are sed and awk?
Objectives
Use the
cat,lessandmorecommands to view file contentsWrite content to a file using
echoUse wildcards to perform actions on a selection of files
![]()
Viewing files contents
To view file contents, we need to first introduce a small command often used in bash scripting to post messages. It is
effectively the print or stdout of UNIX, with a catchy name, echo.
Let’s see how it works.
$ echo "this message"
this message
Seems fairly useless here, but can be a very good way to debug a bash script, to find where the program fails. Now
let’s introduce the > sign, which here will put the message we want into a file. We’ll do this a couple of times as
it will lead into the next section.
$ echo "This message is correct" > correct.txt
$ echo "This message is incorrect" > incorrect.txt
Using a single > overwrites any contents of the file, which is fine for empty files, but not if there is already
material in the file. You can use >> instead to append to a file.
Getting stuck
Now that we have introduced file editing and
echo, you may encounter times when commands do not seem to work. Check your prompt.If it has changed from
$or%to>and running commands doesn’t seem to work anymore, it is likely caused by an unclosed quote"or'. The simple keyboard fix for this isCtrl+Cwhich will cause the shell to exit out of the command that you are typing.
Now, how can we view it? We use a command, cat, short for concatenate to view the contents of the file.
$ cat correct.txt
this correct message
As you can see, it prints the output of the file to the terminal output. On Linux systems themselves, you can type
tac, which will do the reverse.
Most of the time though, files tend to be
longer than a line. So, there is another command called less which opens a new window in which you can view the file.
You can exit by pressing Q, and search for a word using /word. Let’s try for hamlet.txt, which is several
thousand lines long.
$ less hamlet.txt
The command more oddly enough, is not as useful, but also an option to view files. It combines the use of less with
pressing Q to exit, and cat by printing to the screen.
There are another couple of useful commands, head and tail, which by default print the first and last 10 lines of a
file to the screen respectively. You can specify the number of lines by adding a -n flag.
$ head hamlet.txt
THE TRAGEDY OF HAMLET, PRINCE OF DENMARK


by William Shakespeare


Dramatis Personae

  Claudius, King of Denmark.
$ tail -n 5 hamlet.txt
Exeunt marching; after the which a peal of ordnance
                                                   are shot off.


THE END
Familiarisation with “viewing” commands
Spend a few minutes familairising yourself with the commands,
head,tail,less,more,cat. Which do you feel works better in certain situations. Why?
Wildcards
Wildcards are one of the most useful tools in Linux and can be used to substitute any character(s) in a command.
Let’s look into their uses. Ensure that you are in the test directory, and lets create a few files.
$ touch 001.txt 002.txt 003.c 004.py 101.txt 211.py
Let’s use the most useful one first, *, which implies everything. If we type ls *, it will not be very useful
as it will list all the contents of a directory, which ls does anyway. Let’s see what happens if we select only
certain file types, by using * followed immediately with .txt with no whitespace.
$ ls *.txt
001.txt 002.txt correct.txt hamlet.txt incorrect.txt
We only get the files with that extension. It can work in reverse as well, we can only select the files that start with
0.
$ ls 0*
001.txt 002.txt 003.txt 004.py
Now, we can see that all the files starting with 0 have been added, regardless of the extension.
We move now onto the ? wildcard, which will replace a single character rather than all of them.
$ ls 00?.txt
001.txt 002.txt 003.txt
In comparison to our previous command, only the three files have been seelcted. We can use the ? more than once in a
command, as shown below, as our 101.txt file can also be selected.
$ ls ?0?.txt
001.txt 002.txt 101.txt
Our final wildcard is [], which signifies a collection of possible values, which is more specific than ?. We can
specify the exact numbers we want to display. Let’s select the odd numbers.
$ ls 00[13].txt
001.txt 003.txt
Danger with wildcards
These are incredibly useful tools and having a good mastery of these is crucial, particularly with
*as it can be very easy to remove a bunch of files by accident!
Practice using wildcards
Now we will get to use the
wildcards/directory we were referencing in the previous exercise. Practice using the different wildcards to remove, or list out the different files. Remember you can usetouchto create a new empty file.Try combining two or more wildcards (
*,[],?) in the same command. Is the output what you would expect?
Key Points
echois the print statement in UNIX.If pressing
Entergives you e.g.>, this indicates you are writing a string inecho. You can exit it by pressingCtrl+Cto return to the prompt.
command > [file]redirects a command’s output to a file (overwriting any existing content).
command >> [file]appends a command’s output to a file.The different viewing commands
more,lessandcathave different uses depending on the size of your file.
catprints a file directly to the screen,lessopens a new window.The
*wildcard matches zero or more characters in a filename, so*.txtmatches all files ending in.txt.The
?wildcard matches any single character in a filename, so?.txtmatchesa.txtbut notany.txt.The
[]wildcard matches any single character called in the bracket that is present in the filename, so[12].txtmatches1.txt,2.txt, but no other number or character.
Loops and Conditionals
Overview
Teaching: 10 min
Exercises: 0 minQuestions
How can I perform the same actions on many different files?
Objectives
Write a loop that applies one or more commands separately to each file in a set of files.
Explain the difference between a variable’s name and its value.
![]()
Variables in Linux
When using variables it is also possible to put the names into curly braces to clearly delimit the variable
name: $filename is equivalent to ${filename}, but is different from ${file}name. You may find this notation in other
people’s programs.
They are nothing to be concerned about, but are mainly used in for loops which we will cover below and bash scripting.
There are some variables that already exist in bash, like env, or HOME. Some need the $ sign before it (such as
$HOME).
To access the contents of the variable HOME we can use echo.
$ echo $HOME
/Users/johnsmith
Loops
Loops are a programming construct which allow us to repeat a command or set of commands for each item in a list. As such they are key to productivity improvements through automation. They are similar to wildcards and tab completion, using loops also reduces the amount of typing required (and hence reduces the number of typing mistakes).
Suppose we have several hundred genome data files named basilisk.dat, minotaur.dat, and
unicorn.dat. For this example, we’ll use the loops/ directory which only has three example files,
but the principles can be applied to many many more files at once.
The structure of these files is the same: the common name, classification, and updated date are presented on the first three lines, with DNA sequences on the following lines. Let’s look at the files:
$ head -n 5 basilisk.dat minotaur.dat unicorn.dat
We would like to print out the classification for each species, which is given on the second line of each file.
For each file, we would need to execute the command head -n 2 and pipe this to tail -n 1.
We’ll use a loop to solve this problem, but first let’s look at the general form of a loop:
for thing in list_of_things
do
    operation_using $thing    # Indentation within the loop is not required, but aids legibility
done
and we can apply this to our example like this:
$ for filename in basilisk.dat minotaur.dat unicorn.dat
> do
>     head -n 2 $filename | tail -n 1
> done
CLASSIFICATION: basiliscus vulgaris
CLASSIFICATION: bos hominus
CLASSIFICATION: equus monoceros
Follow the Prompt
The shell prompt changes from
$to>and back again as we were typing in our loop. The second prompt,>, is different to remind us that we haven’t finished typing a complete command yet. A semicolon,;, can be used to separate two commands written on a single line.
In this example, the list is three filenames: basilisk.dat, minotaur.dat, and unicorn.dat.
Each time the loop iterates, it will assign a file name to the variable filename and run the head command.
The first time through the loop, $filename is basilisk.dat. The interpreter runs the command head on
basilisk.dat and pipes the first two lines to the tail command, which then prints the second line of
basilisk.dat. For the second iteration, $filename becomes minotaur.dat. This time, the shell runs head on
minotaur.dat and pipes the first two lines to the tail command, which then prints the second line of
minotaur.dat. For the third iteration, $filename becomes unicorn.dat, so the shell runs the head command on
that file, and tail on the output of that. Since the list was only three items, the shell exits the for loop.
We have called the variable in this loop filename in order to make its purpose clearer to human readers.
The shell itself doesn’t care what the variable is called. If we wrote this loop as:
$ for x in basilisk.dat minotaur.dat unicorn.dat
> do
>     head -n 2 $x | tail -n 1
> done
or:
$ for temperature in basilisk.dat minotaur.dat unicorn.dat
> do
>     head -n 2 $temperature | tail -n 1
> done
it would work exactly the same way. Don’t do this. Programs are only useful if people can understand them,
so meaningless names (like x) or misleading names (like temperature) increase the odds that the program won’t do
what its readers think it does.
Conditionals
Conditional statements are also an option in bash, as well as functions. Although useful at times, we won’t be spending too much time on them here as they are best saved for programming itself.
The syntax for conditional statements in bash is as follows:
if [ condition ] ; then
  "do some stuff"
fi
Integer comparison String Comparison Meaning -eq=/==equal to -ne!=not equal to -lt/<<less than -le/<=<=less than or equal to -gt/>>greater than -ge/>=>=greater than or equal to Depending on whether you are dealing with a string or integer, the following comparison may be useful for you.
["$a" -lt "$b"]or(("$a" < "$b"))
Key Points
A
forloop repeats commands once for every thing in a list.Every
forloop needs a variable to refer to the thing it is currently operating on.Use
$nameto expand a variable (i.e., get its value).${name}can also be used.Do not use spaces, quotes, or wildcard characters such as ‘*’ or ‘?’ in filenames, as it complicates variable expansion.
Give files consistent names that are easy to match with wildcard patterns to make it easy to select them for looping.
Bash Scripting
Overview
Teaching: 5 min
Exercises: 20 minQuestions
What is bash scripting
What are the different text editors?
How can I run a bash script?
Objectives
To use the vim or nano text editor to create a bash script
Compile a simple code using a bash script
![]()
Bash scripting
We are finally ready to see what makes the shell such a powerful programming environment. We are going to take the commands we repeat frequently and save them in files so that we can re-run all those operations again later by typing a single command. For historical reasons, a bunch of commands saved in a file is usually called a bash script, but make no mistake, these are actually small programs.
Text editors
There are plenty of text editors in bash scripting, but we will only focus on two here, nano and vim. Both have
their advantages and disadvantages.
Text editors work like commands, in the format editor_name file_to_edit, and opens up a window in which you can edit
the file.
If the file that you are editing does not exist, then it creates one for you.
nano
Nano is considered a very good option for beginners as it is simple to work with, and can help you edit anything,
however if you wish to get things done quicker and have access to more features and shortcuts, then switch to vim.
vim
Vim or Vi IMproved is a highly flexible text editor designed for use on the command line and as its own GUI, but is often the go-to and must know tool for anyone wishing to work on a UNIX system, mainly because all the tools for editing text are there for you to use.
It can be tricky for beginners to get used to the different modes and shortcuts, but once gotten used to, it can save a lot of time and effort.
Getting used to text editors
Using either
vimornano, get used to working with some of the commands to write text, open, close and save the files.If you are using
vimwe recommend using this time to look atvimtutor. Type into your terminalvimtutorAnd you will get a window with an interactive tutorial with clear and instructive commands.
===============================================================================
=    W e l c o m e   t o   t h e   V I M   T u t o r    -    Version 1.7      =
===============================================================================

     Vim is a very powerful editor that has many commands, too many to
     explain in a tutor such as this.  This tutor is designed to describe
     enough of the commands that you will be able to easily use Vim as
     an all-purpose editor.

     ...       ...       ...       ...       ...       ...       ...       ...

                        Lesson 1.1:  MOVING THE CURSOR


  ** To move the cursor, press the h,j,k,l keys as indicated. **
            ^
            k              Hint:  The h key is at the left and moves left.
      < h       l >               The l key is at the right and moves right.
            j                     The j key looks like a down arrow.
            v
 1. Move the cursor around the screen until you are comfortable.

     ...       ...       ...       ...       ...       ...       ...       ...
Creating a bash script
Now that you have gotten used to a text editor, we can start doing some bash scripting. These scripts typically have
the extension .sh.
A very simple bash script is shown below. Recreate the text below in a file called script.sh
#!/bin/bash

# Comments are denoted with a hashtag, and will not be shown in the output

echo "Hello from bash"
We can run this file in the terminal in two ways.
- Using the
bashcommand;
$ bash script.sh
- Changing permissions with
chmod, and being able to run the file as a command
$ chmod u+x script.sh
$ ./script.sh
Doing it this way can mean that depending on your shell, the file name may change to green. A green file usually is an indication that the file is executable and can be run.
Once the script file has been run, whatever you type is the same as typing in a terminal, but allows you to save complex sequences of commands.
We can extend this to work on files as well, which we are covering in the exercise below
Running a coded file
In your chosen language, create a file
.c,.cpp,.pythat prints a simple message or does some arithmetic. You will need either anaconda or a suitable compiler to get this working.Run the file as normal in a terminal (NB: For C, C++ remember to run the output file rather than the
.c,.cppfile)Solution
Here is a solution for Python 3. This file prints out a string and utilises the
mathlibrary
hello.pyimport math print("Hello") print(f'The value of pi is approximately {math.pi:.3f}.')$ python3 hello.pyHello The value of pi is approximately 3.142.
script.sh#!/bin/bash echo "Running python3 file" # Running python file python3 hello.py echo "Run successful"Running python3 file\n Hello The value of pi is approximately 3.142. Run successful
Key Points
Bash scripting and utilising text editors is the most important skill in Linux
Without bash scripting, you are unable to submit jobs on an HPC, and the usability of Linux is limited.
ssh Keys
Overview
Teaching: 5 min
Exercises: 10 minQuestions
What is ssh and the secure shell?
How does an ssh key work?
What is the difference between a public and private key
Why do I need an ssh key?
How do I create an ssh key on different operating systems
How do I log into a supercomputer?
Objectives
Introduce the concepts of ssh keys and why they are needed
Generate an ssh key-pair for different operating systems
![]()
What is SSH?
SSH, also known as the Secure Shell or Secure Socket SHell is a network protocol that gives users, and in particular system administrators a secure way to access a computer over an unsecured network.
A supercomputer, and the cloud is a group of system nodes that can be found at a specific location. Although it would be technically possible to access these locations and plug your own computer into the machine and do the work you need it is a very impractical solution. Therefore a way of accessing the computer over networks that are not secure is necessary, and SSH is an ideal way in which to do so.
It also refers to the utilities that come with it as a result. In implementing SSH, one provides a password and public key authentication, as well as encrypted data communications between two computers over open networks like the internet.
Enabling an ssh key on your device can enable you to connect to a supercomputer in your office, at home, or even on a beach provided you have a form of internet connection.
SSH can also be used to create secure “tunnels” for application protocols, and these are usually graphical sessions such as JupyterHub. On ICHEC systems, an ssh connection through a tunnel is needed to access JupyterHub.
How does an SSH key work?
An SSH key can be thought of like a bar code on an ID tag. The ID tag itself contains other information, such as your name, the company, age, gender, profile pictures and other information. When you go up to a locked door, and present your ID, the scanner checks the barcode on your ID tag to see if it matches the data that it has on the system. If it is a match, then you are granted access to the building/room. If you present a different or expired card, the ID tags will not match and therefore you are unable to access the system.
SSH keys work in exactly the same way, except you have to generate the keys yourself rather than having a security person simply give you a key card. In the same way that the ID card authenticates your identity, the SSH key authenticates the identity of your computer.
When you generate an SSH key, you end up creating what is known as an SSH key-pair. It creates two different ones, one being a public key, the other is a private key.
We will come onto generating SSH keys shortly.
Public and Private keys
When you set up an SSH key, you generate a “key-pair”, a public and private key.
The public key, in cryptographic terms is a large numerical value that is used to encrypt data. Most people don’t need
to worry about it, however it is important to know what is looks like when printed to the screen. Public keys will have
the extension .pub.
The private key, which is generated alongside the public key must stay on your local machine and not shared with anyone. These are used to decrypt messages that were created with the corresponding public key or to create signatures.
In other words, a public key locks up data from unauthorised use, while a private key is used to unlock it. The machines perform a virtual handshake
Create your own SSH key-pair: Part 1
What do you need to do once you have created an SSH key pair, and you want to have access to a supercomputer
- Submit my private key, as the account on the remote system will be private to me, and is needed to perform the virtual handshake
- Submit my public key, as the remote system needs it to perform the virtual handshake
- I don’t need to do anything, as I have both of them. The remote system only needs to acknowledge that my machine exists.
- Submit both my public and private keys, as both will be needed for me to log in and for the machines to perform a virtual handshake
- Generate a new SSH key pair in a different directory
Solution
- No. Your private key should stay on your computer and not be shared with anyone.
- Yes. The systems team or framework will be able to add your ssh key to your account.
- No, the helpdesk team will still need your public key for you to gain access to the system.
- No, only the public key is needed for the virtual handshake.
- No, you only need one ssh key-pair per machine.
Generating an SSH key-pair
The process of setting up an SSH key-pair is relatively simple on Mac and Linux operating systems, but is not as simple on Windows. Depending on your terminal emulator, it can put your SSH key in odd places.
SSH keys typically have a location in a hidden folder in your home directory. Until you create an SSH key-pair for the
first time this directory, .ssh will not exist.
There are many different SSH key types, depending on the algorithm use to generate it. This includes rsa, ed25519,
which have different levels of encryption. Here we will be creating a key with
Create your own SSH key-pair: Part 2
- Navigate to your home directory and execute the following command.
ssh-keygen -t ed25519
- You can then accept the default filename and location for your key-pair, by pressing either
EnterorReturn- Enter a password which you can remember (or alternatively leave it blank), and again press
EnterorReturn. In addition to a course or project account, you will need to enter this password every time you log in.
How can I log into a supercomputer
By now we have created an SSH key-pair, let’s try and log in using the command;
ssh USERNAME@machine.example.com
Here, the USERNAME corresponds in this case to your course account number, the machine is Kay, and example.com
refers to ichec.ie. Think of it like an email address, you can’t send information to anyone without their username
or the domain name (gmail, yahoo, institution)
Logging into Kay
Now using the course account given to you, try and log in by adapting the command above. You will need the password that you generated whilst creating your SSH key.
Solution
You should have got an error saying
Permission denied (publickey).This occurs when your public key has not been added to your account, and is a very common problem that users can encounter. This is not something that you can control as the systems team need to manually link it to the account you are using. Users are not allowed on an HPC with an SSH key alone. At ICHEC, you need to have a project to join or be partaking in one of our courses to gain access.
To gain access, you will need to send your public SSH key either as a ticket to systems, or in this lesson, via a webform which will be posted to you in the chat.
If you are joining us for our intro-to-hpc course, you will be granted access to Kay and have some time to work on some problems.
For now however we can inform you of the next steps.
Once your SSH key has been added, the error message you have experienced will be replaced by a block of text similar to below.
The authenticity of host 'sample.ssh.com' cannot be established.
 DSA key fingerprint is 01:23:45:67:89:ab:cd:ef:ff:fe:dc:bb:98:76:54:32:10.
 Are you sure you want to continue connecting (yes/no)?
By typing yes, you are accepting the remote machine as a known host. You can then continue logging in. You would eventully need to provide your ssh key password and a course account password.
Thise taking the intro-to-hpc course will be provided this information on Monday following the submission of an SSH key.
Key Points
ssh key-pairs are needed to log into most supercomputing systems
To log into ICHEC’s cluster, an ssh key-pair is necessary
You only need one ssh key-pair generated per device
ssh keys are typically stored in the user’s home directory
Extra commands
Overview
Teaching: 5 min
Exercises: 10 minQuestions
How can I search for a string in a file
What are pipes and how do they work?
What are sed and awk?
How can I see the differences between two files?
How can I zip files?
What are
.tararchives?Objectives
Be able to observe differences between files using
diffCreate and work with
.zipfiles and.tararchivesUnderstand the benefits of searching and using pipes
![]()
Searching
We will now look into one of the most useful tools in Linux. There is possibly enough material on this command for a whole episode, but we will keep it simple here.
The command for searching is grep, which stands for globally search for a regular expression. In English, it is
used to search for a string of characters in a specified file.
Let’s use grep to search for all lines in hamlet.txt that contain the word “hamlet”.
$ grep 'hamlet' hamlet.txt
You will notice running this that nothing has happened. We therefore need to use a case insensitive flag (i) to get
this working, we will also add in the display line occurrence flag (n). Case sensitivity is important in grep
$ grep -i "hamlet" hamlet.txt
As you can see, it produces a long output. But where grep really comes in useful is with pipes.
Pipes work on the concept that it is better to combine smaller commands into a more powerful and useful one. They can also help remove unnecessary temporary files, and sends the output of one command to another. The syntax is;
command_1 | command_2 | ... | command_n
Let’s work on this by piping the output of our previous command to less.
$ grep -i "hamlet" hamlet.txt | less
On the output we can see that our less window has opened up. Remember you can type Q to exit.
Piping Hamlet to a file
Use
grepand|to choose a word, “Hamlet”, “Ghost”, “Queen” or another of your choosing and pipe it to a new file.Solution
$ grep -n "Hamlet" | hamlet_occurrence.txt
Spot the difference with diff
We now move onto analysing the difference between files with the diff command. This compares one file to another to
ensure they are the same.
When we type the following command to compare our two files.
$ diff correct.txt incorrect.txt
The < corresponds to the first file entered, in this case correct.txt, and the > corresponds to the second file.
It will produce the following output.
1c1
< This message is correct
---
> This message is incorrect
The 1c1 highlights the lines that are different and what needs changing. This can be very helpful if you are looking
at two very similar files.
Let us change our files incorrect.txt and correct.txt with echo and see the resulting difference with diff.
We can press Enter before closing our quotes to spread the message onto the next line. You will notice something is
different when the prompt changes.
$ echo "This message is correct" > incorrect.txt
$ echo "This message is correct
> but not as correct as this." > correct.txt
Now we will use diff again to see what has changed.
$ diff correct.txt incorrect.txt
2d1
< but not as correct as this.
We see that the output 2d1 is telling us to delete a the second line in our file correct.txt to make it the same as
incorrect.txt.
So having the order right is important. The best way to describe diff is How can I change file 1 to make it the
same as file 2?
If we reverse the command, it will tell us to add a line to incorrect.txt to make it the same as correct.txt.
$ diff incorrect.txt correct.txt
1a2
> but not as correct as this.
Zipped files and archives
You may have encountered file type like .zip, .gz and .tar in your travels, and usually, operating systems such
as Windows might need specified programs to open them. Fortunately in Linux, you can create, zip, unzip, tar and un-tar
files like these.
Zip files are a single file containing one or more compressed files. Tar archives on the other hand are used to package files together for backup or distribution purposes. They are sometimes called “tape archives”. Many companies archive data on tape for long-term storage, which requires less floor space and energy. These archives can then be zipped with GNU Zip compression.
Zipping a file with GNU Zip compression is fairly straightforward, specify the file you want to zip.
$ touch new.txt
$ gzip new.txt
On running this command, we get no confirmation that the file has been created, but we can use ls to confirm that our
new file new.txt.gz has been created. To unzip the file, we use gunzip
$ gunzip new.txt.gz
This returns the file to its original state.
For .tar archives, we need to implement some flags to create it. To create an archive, we need the create c and
file f flags, as well as specitfying a name for the tar archive. You can also add the verbose flag (v), which lists
the files that are being added.
$ tar -cf archive.tar new.txt
If we check our directory, we can see that the original file, plus the tar archive itself are now present. Because this
is now an archive, not a directory, we cannot check its contents. Luckily there is a flag (t) that we can use to view
the archive contents.
$ tar -tf archive.tar
new.txt
As you can see, it lists out the contents of the archive in the same way that ls lists out the content of a directory.
Let us remove the original file, new.txt and then extract the contents of our .tar archive using the x flag.
$ rm new.txt
$ tar -xf archive.tar
Running our ls command will confirm that new.txt has returned to the directory by extracting the file. You can
remove .tar archives using the rm command.
tar-ing andgzip-ing a directoryUse
tarplus its flags to create a.tararchive of thewildcards/directory. Check the contents of the archive. Now zip the archive usinggzip.Finally, unzip and untar the archive.
Solution
$ tar -cf my_archive.tar wildcards/
$ tar -tf my_archive.tar
wildcards/ wildcards/01.txt wildcards/00.txt wildcards/02.txt wildcards/07.txt wildcards/06.txt wildcards/10.txt wildcards/11.c wildcards/04.c wildcards/08.txt wildcards/03.c wildcards/09.txtgzip my_archive.tar gunzip my_archive.tar.gz tar -xf my_archive.tar
sed and awk sub-languages
We won’t go into too much detail about these, as they are primarily used in bash scripting for advanced topics, but it is still useful to know that such tools exist and that they can be used effectively.
sed the UNIX stream editor
The sed command is another handy tool in UNIX that can be used for;
- Searching
- Finding and replacing
- Inserting/deleting
It is mainly used to edit files without the need to go into a file and change it directly. The format is as follows;
sed 'opt/act/flag' file
awk - a language within UNIX
The awk command accesses a sub-language within UNIX. In a similar way that Python can be accessed through the
terminal, awk can be called within UNIX in a self-contained instance. It is a series of rules that take the form;
awk '(condition) {action}' file
This can be used for anything from printing to complex mathematical statements, and can be useful in bash scripting over multiple lines.
Key Points
grepselects lines in files that match patterns. It can be combined with pipes|to be even more useful.
.tararchives are very useful ways of converting a while folder into a single file. They are often used in data sharing.The creation of
.tararchives requires the use of flags to create and untar them.The
-cftar flags create an archive with a specified name. The-xfflag is used to extract the archive contents.