Why should I use a HPC cluster?
Overview
Teaching: 10 min
Exercises: 0 minQuestions
What is HPC?
Why would HPC be important to my work?
What is the difference between login nodes and compute nodes
Objectives
Understand how a HPC system can benefit you
![]()
What is HPC?
A HPC cluster is a collection of ‘computers’ called nodes, all inter connected. Considerably more powerful then just one computer, like your laptop. As an idea of scaleJust for scale - your laptop typically has 8 cores. Kay has 40 cores per node and has 336 normal compute nodes.
Once connected you can avail of the computation power and run scripts too heavy to run on your own computer. There are different types of nodes;
- Login nodes
- Compute nodes
- High memory nodes
- GPU nodes
Why would I need to use a HPC cluster?
The best way to answer this is with an example.
Rationale for using a HPC
Imagine you had a
10x10x10box like the one below, divided up into smaller boxes, each measuring1x1x1. In one hour, one CPU core can simulate one hour of activity inside the smaller box. If you wanted to simulate what was happening inside the large box for 8 hours, be it a molecular interaction, climate, weather as an example, how long will it take to run if we only use one CPU core?
Solution
8000 hours…close to a year!
This is way longer than is feasibly convenient! But remember, that is utilising just one core. If you had a machine that could simulate each of those smaller boxes simultaneously and a code that enables each box to effectively interact with each other, the whole job would only take roughly an hour (but probably a little more because of issues we will discuss in subsequent episodes).

Although the techniques and exact methodologies of speedup like this is beyond the scope of this course, hopefully you now realise and can imagine the types of things that a supercomputer can make possible through either the implementation of high performance code or high quantities of cores.
Login and compute nodes
Imagine the login and compute nodes as a catalog retailer like Argos. You enter into the shop, you are on the login nodes. These are the initial entry points into a HPC system. You may well see a reflection of this in the prompt.
course00@login2:~$
These login nodes can be considered the “foyer” of the HPC system, the external interface, you can browse the catalog of the HPC, i.e. check out the different libraries, use UNIX commands. But there is a problem with the login nodes, which is everyone is using them. In the same way everyone enters a shop and explores, and the more crowded a shop is, the slower things seem to happen.
If you decide to do work in this shop, for example by running code and utilising libraries, the more space you take up. The shop’s floor space is limited, and similarly, the login node space is limited. What can happen is that someone decides (wrongly) to run a long code in the login node, which takes up space and therefore everyone else is impacted by it. You also get in trouble with systems!
Let’s think about our example of Argos. The “foyer”, where you enter into the shop has an open space with a few desks. You may have a few little things like memory sticks or a packet of mints that you can buy on the way to the till.
But the most important feature are the catalogs on the desks, which have a list of all the items available. Next to it you have some pencils and notepads where you write in the catalog number of the items(s) that you wish to purchase. You then deliver your list of orders to the till and then an attendant gets the items for you behind the scenes while you wait.
These can be thought of as the action of submission scripts and compute nodes. The compute nodes are like the warehouse of the store, all the important things are stored there and is where all the major work is done. On a HPC, the compute nodes are the place that your code is run.
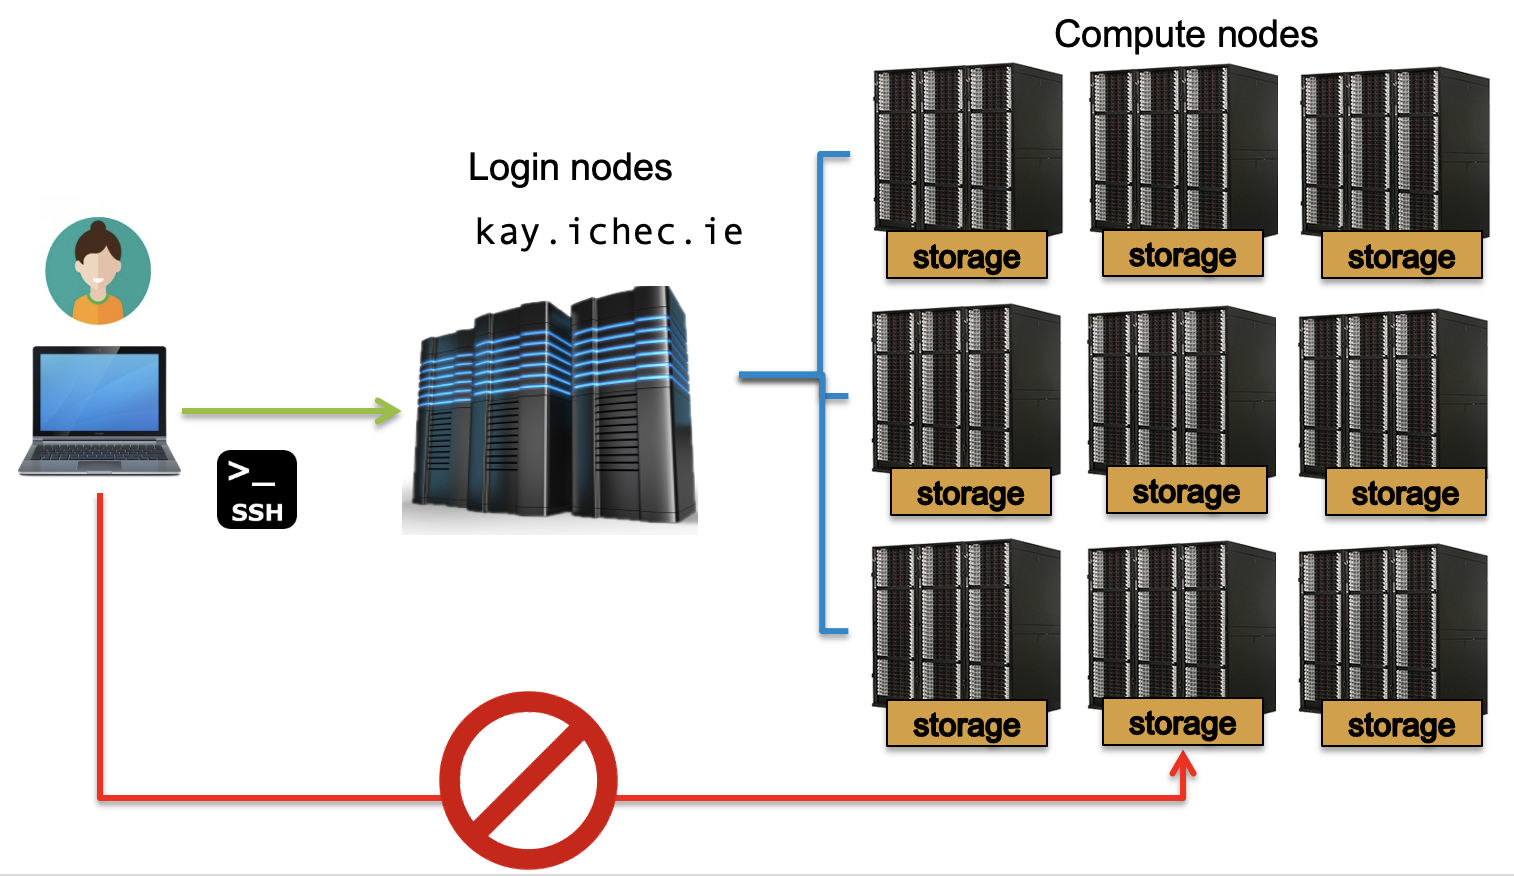
The submission scripts, i.e. the list of orders in our shop, is sent to the compute node to undertake a task, where all the work is done behind the scenes. There are ways to access the compute nodes directly, but that is beyond the scope of this course
These compute nodes are controlled by a queueing system, and depending on the program submitted and the resources asked for, you will be assigned a queue. The job will wait in the queue until the requested resources are available.
For this reason, the login nodes are only to be used for installing packages, moving files, and running small snippets of code, no longer than a few minutes. Just enough to check that your code is working properly
ICHEC’s national service
ICHEC’s National Service provides three different project classes with differing resource allocations, review levels and review turnaround times. The selection of each class largely depends on the necessities and requirements of the research and applicant’s objectives.
You can use our core calculator) to calculate the number of core hours depending on the node type. If you are considering undertaking a project with ICHEC, this can be a useful resource.
Class C Project: Discovery
Class C projects are intended to provide fast access to modest resources with less review overhead. They have multiple possible uses including:
- Introductory access for inexperienced HPC users
- Exploratory access for researchers who need to develop, port, optimise or benchmark codes
- Easier access for users planning small scale runs with very modest requirements
Class C project applicants should note that the maximum resource levels are modest and will be exhausted very quickly if larger scale runs are performed.
| Item | Amount |
|---|---|
| Max. CPU | 100,000 h |
| Max. Storage | 250 GB |
| Max. Duration | 12 months |
| Max. Review | 1 week |
| Proposal | 2-3 pages. |
| Applicants | Group Leader/Professor/Lecturer/Post-doc/Graduate Student |
Class B project: Regular
Class B projects are intended for the needs of the majority of the research community. Typically applicants will be small research groups or individual researchers. Successful applications are expected to lead to referred publications.
| Item | Amount |
|---|---|
| Max. CPU | 1,000,000 h |
| Max. Storage | 2000 GB |
| Max. Duration | 18 months |
| Max. Review | 8 weeks |
| Proposal | 4-5 pages. |
| Applicants | Group Leader/Professor/Lecturer/Post-doc |
Class A project: High Impact
Class A projects are intended for consortia concerned with high impact problems. These groups will require resources representing a substantial fraction of the centre’s resources over a long period of time. Successful applications are expected to yield high-impact scientific publications.
Class A project project applicants are expected to have a good knowledge of the characteristics of the code(s) which they intend to use - such as scalability properties - before writing their proposal. For this reason, applicants who are not in such a position are advised to first apply for an exploratory Class C project in order to undertake a basic scalability and performance study. Such an exercise is essential to provide an accurate estimate and a proper justification of the resources requested.
| Item | Amount |
|---|---|
| Max. CPU | 10,000,000 h |
| Max. Storage | 5000 GB |
| Max. Duration | 24 months |
| Max. Review | 12 weeks |
| Proposal | 6-10 pages. |
| Applicants | Group Leader/Professor/Lecturer/ |
Key Points
High Performance Computing (HPC) involves connecting to large computing systems elsewhere in the world
HPCs typically have thousands to hundreds of thousands of cores
HPCs have the ability to perform calculations and run simulations that would be impossible on normal machines
Connecting and moving around
Overview
Teaching: 10 min
Exercises: 10 minQuestions
What is an SSH key, and how do I set it up?
How can I connect to a remote cluster?
Can I be reminded of the most important Linux commands?
What is the difference between my
homeandworkdirectoriesObjectives
Set up an SSH key pair if not already done so
Connect to a remote HPC system
![]()
SSH keys
If you have taken our Introduction to Linux course, you will already be familiar with SSH keys through the SSH key episode. If you have not, then here is a quick overview.
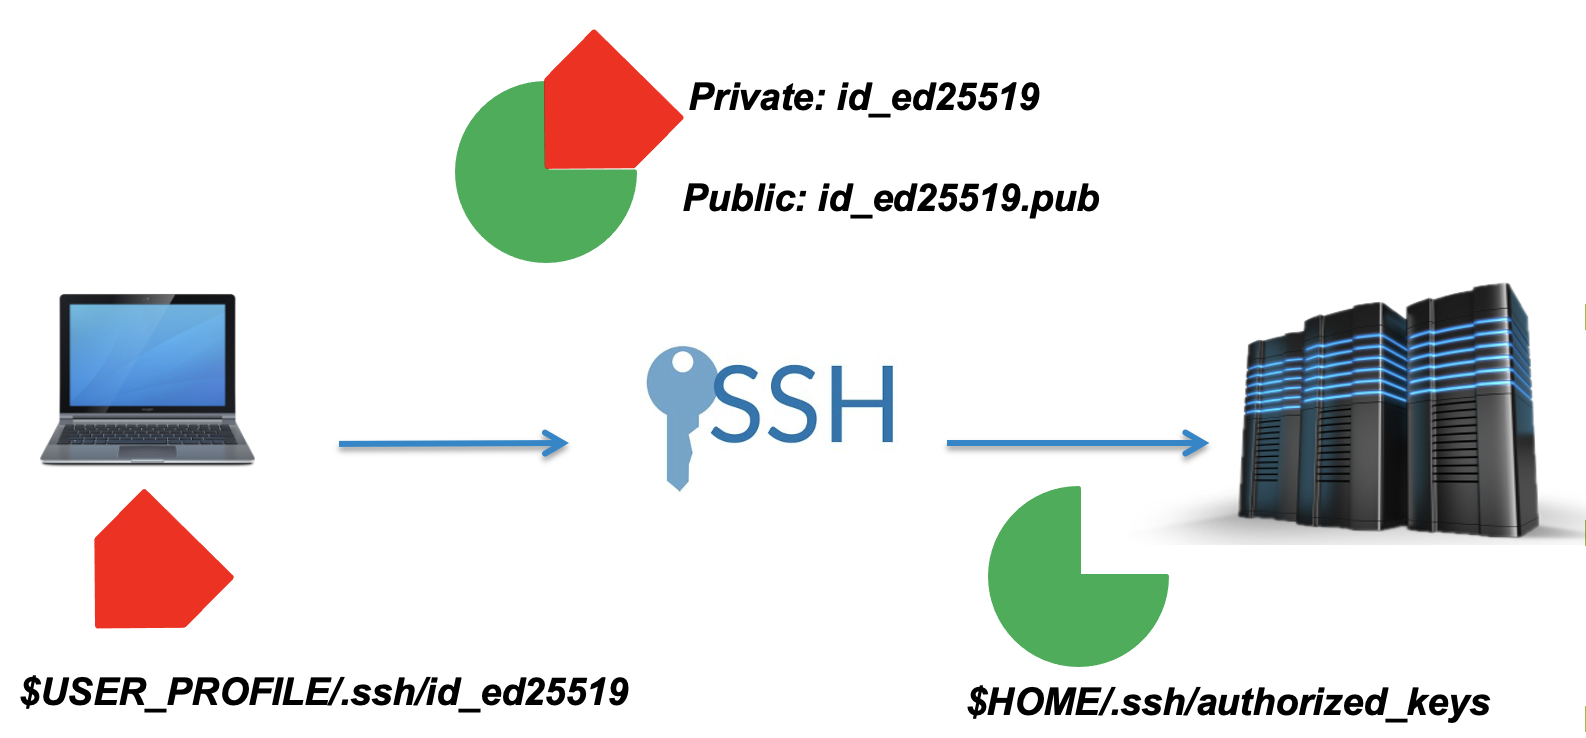
SSH, also known as the Secure Shell or Secure Socket SHell is a network protocol that gives users, and in particular system administrators a secure way to access a computer over an unsecured network. Most of the worlds supercomputers, or clusters require the use of an SSH key to gain access
When you set up an SSH key, you generate a “key-pair”, a public and private key. These will be stored in your home directory.
See here for a recap
For Windows MobaXterm users
MobaXterm will not automatically generate a public key in the correct directory, you will need to do 2 steps to get your public key working effectively.
- In Settings Tab –> Terminal Tab –> Terminal features Box, ensure that the Paste using right-click box is left un-ticked.
- In Settings Tab –> General Tab –> Persistent home directory Box Enter
_ProfileDir_into the box, otherwise your public ssh key will be denied by ICHEC systems.
The public key, in cryptographic terms is a large numerical value that is used to encrypt data. Most people don’t need to worry about it, however it is important to know what is looks like when printed to the screen. Public keys will have the extension .pub.
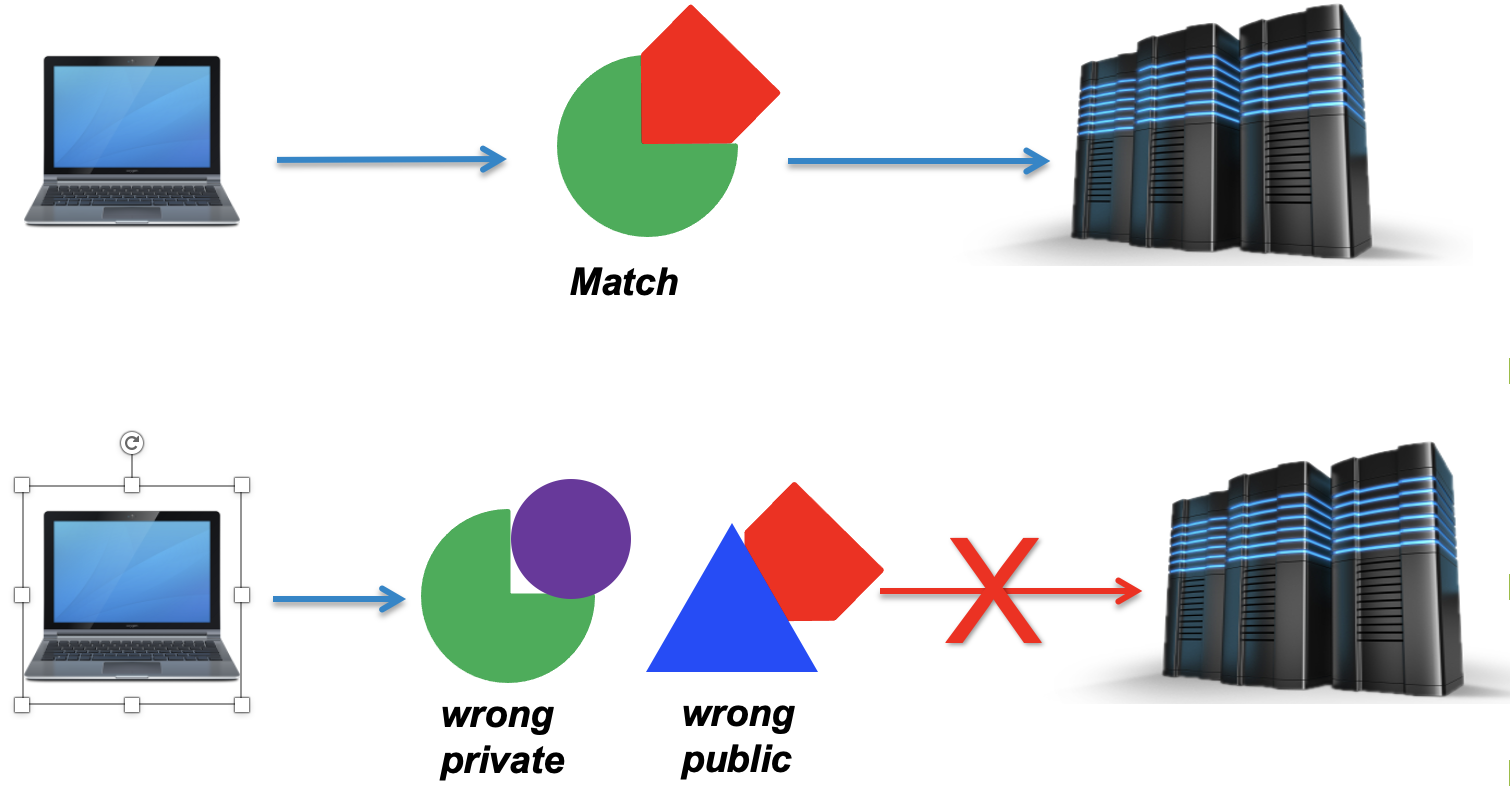
The private key, which is generated alongside the public key must stay on your local machine and not shared with anyone. These are used to decrypt messages that were created with the corresponding public key or to create signatures.
In other words, a public key locks up data from unauthorised use, while a private key is used to unlock it. The machines perform a virtual handshake.
A note on private keys
Private keys are your private identity on an HPC system.
A private key that is visible to anyone but you should be considered compromised, and must be destroyed. This includes having improper permissions on the directory it (or a copy) is stored in, traversing any network in the clear, attachment on unencrypted email, and even displaying the key (which is ASCII text) in your terminal window.
Protect this key as if it unlocks your front door. In many ways, it does.
Logging into Kay (15 minutes)
You will have been sent a link to submit your ssh keys in the last few days, if you have not submitted your ssh key you must do so now.
If you have sent your public key in, your ssh key will have been added to your course account. You should ONLY USE YOUR COURSE ACCOUNT FOR THE DURATION OF THIS COURSE, REGARDLESS IF YOU ALREADY HAVE AN ACCOUNT WITH US.
Try and log in using the following command. Replace the XX with the course account nthat you have been given
ssh courseXX@kay.ichec.ieYou will be asked for a passphrase for your public ssh key. This passphrase is out of ICHEC’s control and only you should know this passphrase, having generated it yourself. It will look similar to below, as it is searching for the location of your public key in your home directory.
Enter passphrase for key '/Users/johnsmith/.ssh/id_ed25519':Next will be the password provided for this course. If you are accessing this material outside of a course, this will be your password associated with your account.
course00@kay.ichec.ie's password:Once you get the following output, you have successfully logged in.
#############################################################################
#      _  __      __     _______ _____ _    _ ______ _____   _____ ______
#     | |/ /    /\\ \   / /_   _/ ____| |  | |  ____/ ____| |_   _|  ____|
#     | ' /    /  \\ \_/ /  | || |    | |__| | |__ | |        | | | |__
#     |  <    / /\ \\   /   | || |    |  __  |  __|| |        | | |  __|
#     | . \  / ____ \| | _ _| || |____| |  | | |___| |____ _ _| |_| |____
#     |_|\_\/_/    \_\_|(_)_____\_____|_|  |_|______\_____(_)_____|______|
#
#############################################################################
#
# You have been successfully logged in to the Kay National HPC System
#
# Documentation: https://www.ichec.ie/academic/national-hpc/kay-documentation
#
# For technical support, email support@ichec.ie
#
##############################################################################
If you finish this exercise quickly, feel free to have a look at the Linux commands below and get some practice while you wait.
Clone the lesson repository
In your current working directory, which should be similar to
course00/home/, type the following command:git clone https://github.com/ICHEC-learn/intro-to-hpc.gitThis will clone the lesson’s repository into your current directory, and you have access to all the lecture material including slides, exercises and markdown files. You can download this material later when we use the
scpcommand.
A review of the Linux commands
If you are new to Linux, then we highly recommend that you go through the materials covered in our Introduction to Linux course before continuing. A brief summary of the most commonly used commands are given below.
pwd - print working directory
This is a very simple command which shows you where you are in the directory tree.
$ pwd
/ichec/home/users/course00
ls - list
Lists out all the files and directories in your current working directory. This command has a few extra flag options.
Flags need to be accompanied with a - before it
$ ls -l
| Flag | Operation |
|---|---|
a |
show hidden files |
t |
sort by modification time |
l |
long, detailed list |
d |
express directory as a file |
h |
human readable |
cd - change directory
Probably the most commonly used command, used to change directories.
| Action | Operation |
|---|---|
cd dir |
Move into dir directory |
cd .. |
Move back 1 directory |
cd ../../ |
Move back 2 directories |
cd or cd ~ |
Move to home directory |
cd - |
Move to previous directory |
mkdir and rmdir - make directory and remove directory
The command mkdir creates a new empty directory, and rmdir can remove an empty directory.
$ mkdir new_directory
$ rmdir new_directory
mv and cp - move and copy
Move mv and copy cp work in very similar ways, where two inputs are needed, first the file that you are
copying/moving and second the location you are moving/copying to. The mv command has a secondary use to
rename a file.
$ mv file1 renamed_file1
$ mv file1 mydir
$ cp file1 mydir
rm - remove
The remove command rm is a particularly dangerous command, as the shell deletes files instantly, bypassing the regular
recycle bin.
| Flag | Operation |
|---|---|
r |
Recursive, removes directory and all files within |
f |
Force, no prompt |
i |
Prompts before removing file |
It is recommended to use rm with the -i flag at first
$ rm myfile.txt
man and --help- manual and help
The manual, man command displays a user manual of any command, including the different flag options associated with
that command.
$ man ls
The --help command serves a similar purpose to man, with a different implementation.
history - last commands typed
History is a helpful command which by default shows the last 1000 commands used. It can sometimes be helpful to pipe it
to less using |.
$ history
grep - search
The search command, grep stands for globally search for a regular expression, and is one of the more powerful commands in UNIX, particularly when used with pipes.
grep 'expression' file.txt
vim and nano - text editors
The programs vim and nano are text editors that can be used on most HPC clusters. We will work with these more in
upcoming episodes. We would recommend using vim as it has plentiful useful shortcuts and is very versatile. It can be
tricky to learn, so feel free to use nano for an easy use file editor.
$ vim myfile.txt
$ nano myfile.txt
This will be covered in more detail in the next episode.
Key Points
SSH keys are used to establish secure shell connections to remote computers. Most HPCs worldwide require them to gain access.
To log into a HPC, use
ssh YourUsername@remote.computer.address
Moving and editing
Overview
Teaching: 10 min
Exercises: 0 minQuestions
How can I edit files on my HPC
How can I change file permissions?
How can I transfer files from a HPC
Objectives
Learn how to navigate around a remote system
Utilise navigational Linux commands
Understand and manipulate UNIX permissions
Utilise the
vimtext editor tool
![]()
Using text editors
In the previous episode, we saw a reference to text editors, namely vim and
nano
Getting used to text editors
Spend 10 minutes getting used to working with
vimornano
Command Action iEnter into INSERT mode, which will allow you to write text EscEnters into COMMAND mode, where commands like the below can be written :wqWrites, saves and exits the file :q!Force quits without saving
nanohas all the commands in the editor window.
File permissions
All files have owners. There is yourself, the machine user, a group owner, which is a group on a machine and then others.
Once you are on a machine and have multiple people on the same machine, it is important to know that others can access your files. By default, you, the machine user and write and edit a file, but everyone else will have read-only privileges. Let’s see what this looks like.
$ ls - lh hamlet.txt
-rw-r--r-- 1 user staff 193K 11 Jan 12:00 hamlet.txt
The -h flag puts our output into human-readable format, so the size of our file is expressed in kilobytes. The main
area of interest for us though is on the left.
The first - may sometimes be filled with d, standing for directory, however our interest area are the 9 characters
to the right, which is divided into three sections, user, group and other.
The first section above has the three characters rw-, which indicates that the user can read and write content to the
file. The permission can be changed so that the file can be executed or run, however we will come to that shortly.
The second section r-- refers to the group owner, i.e. a group on a machine. Here the w has been replaced with a
- indicating that the group has read-only permissions. This is a similar case for the third section, also r--,
which indicates that others have read-only permissions.
Who cares you may ask. Well, a common occurrence is that people on a project or a course would need to share and edit files,or need to access materials from a directory outside of their account. As things stand, this is not possible, but by changing permissions, this is possible.
We can change the permissions of a file using chmod along with a variety of flags which can add or take away file
permissions. Let’s change the permissions of our correct.txt, then use echo to write to the file.
$ chmod u-w correct.txt
$ echo "new line" > correct.txt
permission denied: correct.txt
As you can see, because we have changed permissions, we cannot edit the file anymore.
Let us change the permissions, but add writing permissions to all users (user, group, other)
$ chmod ugo+w correct.txt
Now when we check the permissions with ls -lh we can see that the permissions have changed to;
-rw-rw-rw-
Changing file permissions
You may need to change the permissions of a file so group users can edit, or execute the file.
Create a new file,
my_script.sh, which should automatically have the permissions-rw-r--r--. Check yourself that the file has these permissions, then;
- Add executable permissions for user and group
- Remove reading permissions for other
Solution
$ chmod ug+x my_script.sh
$ chmod o-r my_script.sh
There are also number notations corresponding to u, g and o read, write and executable permissions, as shown in
the table below.
| Character | Number Notation | Character | Number Notation |
|---|---|---|---|
--- |
0 | r-- |
4 |
--x |
1 | r-x |
5 |
-w- |
2 | rw- |
6 |
-wx |
3 | rwx |
7 |
These numbers are read in as a three character long binary number, read from right to left. The below example shows how the numbers can be summed up, so that;
- The owner can read, write and execute the file
- The group can read and execute the file, but not edit it
- All others cannot read, write or execute it
OWNER  GROUP  OTHER
r w x  r w x  r w x
1 1 1  1 0 1  0 0 0
  7      5      0
  |______|______|
         |
        750
If we wanted to change a file’s permissions to match the above, we can do so using;
$ chmod 750 my_script.sh
Who has what permissions?
Have a look at the different
rwxpermissions and numerical equivalents, and deduce who has what permissions, or who has been granted, or had permissions retracted
rwxrwxr--r--r--r--755700rwxrw-r--chmod u+x filechmod go-wx fileSolution
- User and group can read, write, execute. Other can only read the file.
- User, group and other can only read the file
- User can read, write and execute the file. Group and other can read and write the file.
- User can read, write and execute the file, group and other cannot do anything.
- User can read, write and execute the file. Group can read and write the file. Other can read the file.
- The user has been given permission to execute the file.
- Group and other has has permissions to read and write the file retracted.
File transfer with scp
So, you’ve created a file or group of files on your account, now how can you copy them onto your local machine?
To do this we need to remind ourselves of the difference between your local machine and the remote host. This is
always outlined in the prompt, so recognising the information in the prompt is very important. Let us take a
simplified example of the Earth and a satellite. The Earth, or specifically a specific “address” on the Earth is
the local machine, let us say it has the address 0123-laptop. The satellite is the remote host, the machine
that you are connecting to, let us say it has the address satellite.world. For each of these machines, you have a
username, and they may be different depending on the machine, but for simplicity here we will use the same username,
johnsmith. The prompts for the local and remote machines would therefore be as follows;
- Local:
johnsmith@0123-laptop - Remote:
johnsmith@satellite.world
Let’s have a quick think first.
Transferring files… “where” is important!
Say that you are have some files on the satellite and you want to take them off the satellite and onto your local machine. Where would you need to run the command to transfer files from?
Solution
Your local machine.
Whether you were right or wrong, take a moment to think about why.
You may have been a bit stumped by that, because surely as we are working on a remote host, be it a supercomputer or
satellite, that should be where the command is run from, but it is not. Let’s take the situational approach, and
imagine you are working on the satellite in the directory johnsmith@satellite.world:~/files/, with a files present
there called mydata.dat. You now want to transfer it to a directory your local machine, the address and directory
that you want to send it to being johnsmith@0123-laptop:~/localdata/. There is a big problem here, as the satellite
has no idea where 0123-laptop is!
Laptop/local addresses are typically very vague without much context, but that is not the reason. You can connect from a local host to a remote host but not the other way around. Therefore the local host has to fetch material from the remote host.
Therefore, we need to take note of the path to our file on the remote host, ~/files/myfile.txt. From there, we need
to open a terminal on our local machine and utilise a new command, scp, which stands for secure copy. From there,
it operates in a very similar way to the cp command.

On your local machine, the syntax is as follows;
$ scp johnsmith@satellite.world:~/files/myfile.txt /path/to/directory
You may well need to enter the passwords that you needed to access the remote machine. A useful tip to make the command
more manageable, is to navigate to the directory that you want to put the files on your local machine, and use the
current directory notation (.) in the following manner.
$ scp johnsmith@satellite.world:~/files/myfile.txt .
This places the file into your current directory, and can be a handy way to make the command less complicated for starters!
Often, we don’t just transfer one file at a time, we may want to transfer entire directories, which we do by using the
recursive flag (-r) as shown below.
$ scp -r johnsmith@satellite.world:~/files .

If you want to get something from your local machine onto a remote host, then the command will naturally be a bit different, as the file to be transferred needs to go first, followed by the directory to put it into on the remote host. It is once again recommended to navigate to the local file and confirm the directory on the remote host.
$ scp localfile.txt johnsmith@satellite.world:~/files/
scpfiles onto your local machineUse
scpto undertake the following steps
- Create a directory on the remote host and create some empty files.
- Use
scpto transfer a single one of those files to a directory on your local machine.- Repeat but use the recursive option to copy the entire folder to your local machine.
- On your local machine, edit the file you have copied, and add another file into the directory you have transferred.
scpyour edited files and directory back onto the remote host.
Common problems that can be encountered with this include running the command on the remote host rather than the local machine. So be careful to keep that in mind. Some terminal emulators, such as Cygwin do not have the option to use two terminal windows simultaneously can be tricky. We recommend therefore taking a note of the directory where your file is stored on the supercomputer before attempting.
SCP/SFTP clients
There are plenty of software packages out there that can utilise SCP, and not all of them need to be based in the terminal. The main clients (some of which have terminal emulators) include, but are not limited to;
- MobaXterm
- Git Bash
- Filezilla
- Bitvise
- WinSCP
- Cyberduck
That being said however, the terminal option is preferable in place of having another software package on your machine.
Key Points
You will have 2 main directories associated with your account. Your
workdirectory will have much more space thanhomeAbsolute path is the location in a file system relative to the root
/directoryRelative path is the location in a file system relative to the directory you are currently in
vimis one of the most popular and flexible text editors
Understanding Modules and Environments
Overview
Teaching: 10 min
Exercises: 0 minQuestions
What are modules?
How can I see what modules are available?
How can I load/unload modules on an HPC system?
What is an environment
How can I set up an environment
Objectives
Use modules to use specific compilers and libraries
Set up a conda environment
![]()
Modules
Modules are more of a concept, and a way of implementing and loading software packages on an HPC system. On your local machine, let’s take Anaconda as an example, you install it and it is there ready for you to use.
On an HPC, for the login nodes, for commonly used software packages, this is also true. But for the compute nodes, we need to load the software packages so we can use them. You may be asking though, why do we even need to load them? This is because supercomputers will have hundreds of different software packages, much more than any individual will ever use. Each of these software packages need different settings in terms of paths and other environment variables, which can inadvertently affect each other or even be mutually exclusive. Users may also want different versions of the same software, which in general cannot be intstalled or used in parallel on the same system.
Therefore the settings for all these software packages and their supported versions are encapsulated in environment
modules maintained by the module system. Thus, there is a command for accessing the module system, module. This
command on its own displays a manual of the different options available for the command.
It is through the loading of these modules that we can have access to software packages when running jobs on the compute nodes and doing quick tests on login nodes.
If we type the following;
$ module list
We get the following output;
No Modulefiles Currently Loaded.
So from here, we can load some software packages. We will refer to them as modules from now on. From here, we need to figure out the software packages that we will need. We can easily do this by typing;
$ module avail
--------------------------------------- /ichec/modules ----------------------------------------
abaqus/2017                     hdf5/intel_mpi/1.12.0
abaqus/2018(default)            intel/2017u8
...                             ...
This shows all the available modules that are currently installed on ICHEC systems, and as you can see, it is a fairly extensive list. You may find however that not all modules are available that you may wish to use in your workflow. This is when you can install a package yourself, however doing so will require you to use the login nodes and when coming to use this package, you will need to reference the directory in which the package is installed. This however is beyond the scope of this lesson, and you are free to explore this in your own time.
We can use the load command to load a module. Let’s keep things simple and load the conda/2 module, and then display
the modules that we have loaded.
$ module load conda/2
$ module list
Currently Loaded Modulefiles:
  1) conda/2
To unload a module or a number of modules, we can do two things. First is to use module unload conda/2, but we may
want to make sure all modules are unloaded and this can be done using purge.
$ module purge
Loading and unloading modules
- Try and load an
intelmodule, of which there are plenty to choose from.- Load another
intelmodule. What happens?- Load a few more modules of your choosing and list them out
- Use a combination of
unloadandpurgeto remove the currently loaded modules
Key Points
Modules are the way to make software, compilers and libraries available within the login session
To load a module, use
module load my_moduleAn environment typically refers to a directory that contains a specific collection of installed packages
The
baseconda environment will have a selection of python packages
Bash Scripting
Overview
Teaching: 10 min
Exercises: 0 minQuestions
What is a scripting language
Objectives
Write a script
Write simple loop and conditional statements
Understand how to use variables in a bash script
![]()
What is bash scripting?
If you have taken our intro-to-linux course, you should already be familiar with the concept of bash scripting. If so then you can skip to the next episode.
Bash scripting is by far the most important concept in HPC computing, without it, you cannot submit submission scripts to the login nodes to run. We will look over some concepts and key skills associated with a simple bash script before we move onto actual job submissions in the next episode.
Text editors
There are plenty of text editors in bash scripting, but we will only focus on two here, nano and vim. Both have
their advantages and disadvantages.
Text editors work like commands, in the format editor_name file_to_edit, and opens up a window in which you can edit
the file.
If the file that you are editing does not exist, then it creates one for you.
nano
Nano is considered a very good option for beginners as it is simple to work with, and can help you edit anything,
however if you wish to get things done quicker and have access to more features and shortcuts, then switch to vim.
vim
Vim or Vi IMproved is a highly flexible text editor designed for use on the command line and as its own GUI, but is often the go-to and must know tool for anyone wishing to work on a UNIX system, mainly because all the tools for editing text are there for you to use.
It can be tricky for beginners to get used to the different modes and shortcuts, but once gotten used to, it can save a lot of time and effort.
Getting used to text editors
Using either
vimornano, get used to working with some of the commands to write text, open, close and save the files.If you are using
vimwe recommend using this time to look atvimtutor. Type into your terminalvimtutorAnd you will get a window with an interactive tutorial with clear and instructive commands.
===============================================================================
=    W e l c o m e   t o   t h e   V I M   T u t o r    -    Version 1.7      =
===============================================================================

     Vim is a very powerful editor that has many commands, too many to
     explain in a tutor such as this.  This tutor is designed to describe
     enough of the commands that you will be able to easily use Vim as
     an all-purpose editor.

     ...       ...       ...       ...       ...       ...       ...       ...

                        Lesson 1.1:  MOVING THE CURSOR


  ** To move the cursor, press the h,j,k,l keys as indicated. **
            ^
            k              Hint:  The h key is at the left and moves left.
      < h       l >               The l key is at the right and moves right.
            j                     The j key looks like a down arrow.
            v
 1. Move the cursor around the screen until you are comfortable.

     ...       ...       ...       ...       ...       ...       ...       ...
Creating a bash script
Now that you have gotten used to a text editor, we can start doing some bash scripting. These scripts typically have
the extension .sh.
A very simple bash script is shown below. Recreate the text below in a file called script.sh
#!/bin/bash

# Comments are denoted with a hashtag, and will not be shown in the output

echo "Hello from bash"
We can run this file in the terminal in two ways.
- Using the
bashcommand;
$ bash script.sh
- Changing permissions with
chmod, and being able to run the file as a command
$ chmod u+x script.sh
$ ./script.sh
Doing it this way can mean that depending on your shell, the file name may change to green. A green file usually is an indication that the file is executable and can be run.
Once the script file has been run, whatever you type is the same as typing in a terminal, but allows you to save complex sequences of commands.
We can extend this to work on files as well, which we are covering in the exercise below
Running a coded file
In your chosen language, create a file
.c,.cpp,.pythat prints a simple message or does some arithmetic. You will need either anaconda or a suitable compiler to get this working.Run the file as normal in a terminal (NB: For C, C++ remember to run the output file rather than the
.c,.cppfile)Solution
Here is a solution for Python 3. This file prints out a string and utilises the
mathlibrary
hello.pyimport math print("Hello") print(f'The value of pi is approximately {math.pi:.3f}.')$ python3 hello.pyHello The value of pi is approximately 3.142.
script.sh#!/bin/bash echo "Running python3 file" # Running python file python3 hello.py echo "Run successful"Running python3 file\n Hello The value of pi is approximately 3.142. Run successful
Key Points
A shell script is a list of bash commands in a
.shtext fileBash scripting is an essential element in HPC
Submitting Jobs
Overview
Teaching: 10 min
Exercises: 0 minQuestions
What is the Slurm Workload Manager?
How do I submit a simple job on a HPC?
How can I submit a job with loaded modules
Objectives
Write a submission script and submit it to a queue.
![]()
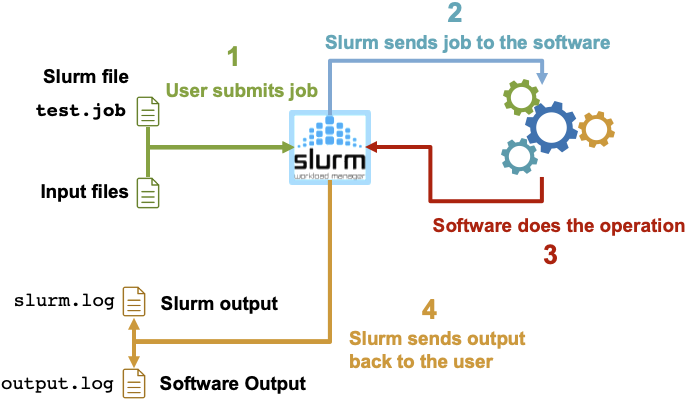
Job scripts
Job scripts are a form of bash script, but one which is managed with the Slurm Workload Manager, known as Slurm for short. It is a free and open source job scheduler for Linux and UNIX-like kernels and is used by many of the world’s largest supercomputers and clusters.
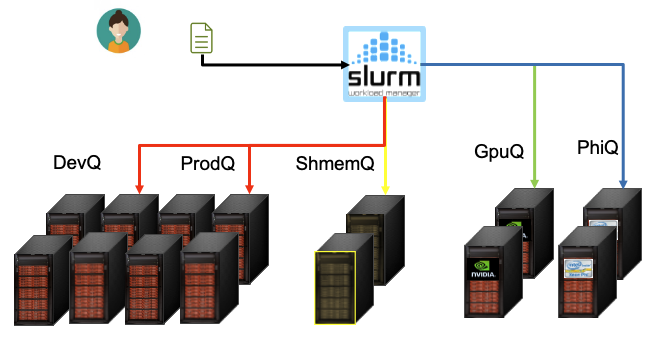
Why is it needed you may ask? Think of it like a waiter at a restaurant, dealing with different clients, each coming in and sending different orders to the kitchen. They are there to ensure that the kitchen doesn’t get overrun with orders and so they can effectively plan a service. In the same way that you may have 100 customers and only 5 chefs and 10 stoves, there will likely not be enough compute resources to get your job submitted effectively.
When you create a job script and submit it to a queue to run, a number of things happen.
- The user submits the job to Slurm win a job file, which can be a
.sh,.jobextension - Slurm sends the job to the software to execute
- The software does the job over an “X” period of time
- Slurm sends information back to the user in therms of slurm output (
slurm.log) and software output (output.log)
A typical job script looks something like the code block below, which has been simplified to show the slurm notation.
#!/bin/bash

#Slurm flags
#SBATCH --account=course
#SBATCH --nodes=1
#SBATCH --time=00:30:00
#SBATCH --job-name=test
#SBATCH --output=slurm.log

# Change into a directory where you want the job to run

cd $SLURM_SUBMIT_DIR

"""
Load modules, do some work
"""
Notice that each of the slurm commands is denoted with the comment #SBATCH
The absolute essentials for a job submission file are;
- Time
- Account
- Job Name
- Nodes
The partition can usually be handled by slurm and the job can be sorted into a specific queue. However for a course
like this, we can assign the partition to CourseDevQ. You will only have access to this queue if you are logged in
with a courseXX account. You can also have reservations, which as the name suggests reserves a few compute nodes
for a group of users with the reservation keywords. The reservation can be thought of as the chef’s table, a priority.
#SBATCH --partition=CourseDevQ
#SBATCH --reservation=CourseReservation
You can also add in options such as mail-user from which you can add your email address, and mail-type, which will
send an email to the specified email address if you want to receive information on when your job starts and finishes.
These are handy tools but not often used.
#SBATCH --mail-user=myemailaddress@universityname.ie
#SBATCH --mail-type=BEGIN,END
Slurm commands
Its all well and good creating a job script, but we need to submit it to the queue. Luckily, slurm has a series of commands which can be used to submit, monitor and cancel a job.
Upon submitting a job script, you will be presented with a job-id, which you can then use to check the status and/or cancel the job.
| Command | Description |
|---|---|
sinfo |
Queue Status |
sbatch myjob.sh |
Submit Job |
squeue -u $USER |
Check Job Status |
scancel 123456 |
Cancel Job |
mybalance |
Check Project Account Balanace |
Submitting a job
#!/bin/bash

"""
ADD IN SLURM COMMANDS
"""

# Move into submit directory

cd $SLURM_SUBMIT_DIR

module load gcc/8.2.0

# Compile the program
Modify the file
myjob.shabove and add in the appropriate SLURM commandsYou can use a python file, or write your own C or C++ file. A standard C++ “Hello World” file has been created for you, which can be found here
As an optional slurm flag, you can add in the
--mail-userand--mail-typecommands to get an email when the job finishes.Once the job is complete, have a look at the slurm output file,
slurm.log. Is the output what you expected?Solution
#!/bin/bash

#SBATCH --partition=CourseDevQ
#SBATCH --reservation=CourseRESERVATION
#SBATCH --nodes=1
#SBATCH --time=00:05:00
#SBATCH --job-name=myjob
#SBATCH --account=course
#SBATCH --output=slurm.log

# Optional
#SBATCH --mail-user=username@example.com
#SBATCH --mail-type=BEGIN,END

# Move into submit directory

cd $SLURM_SUBMIT_DIR

module load gcc/8.2.0

# Compile the program
g++ -o helloworld.o hello_world.cpp
More practice with job submissions
Head into the
files/exercisesdirectory in the cloned repository, you will find a series of slurm scripts for you to edit and submit, again with the simple C++ filehello_world.cpp.Each slurm script has an aspect that needs changing, so edit the slurm scripts accordingly.
Key Points
The scheduler handles how compute resources are shared between users
A job is a shell script with specific instructions for the scheduler
Ideally, every shell script should be run through an interpreter
You should allocate more resources than you need, otherwise your job will be ‘killed’